エージェントと Agentic AI
このセクションでは、langchain4j-agentic モジュールを使用してエージェント型 AI アプリケーションを構築する方法を説明します。モジュール全体は実験的機能と見なされており、将来のリリースで変更される可能性があることに注意してください。
エージェント型システム
AI エージェントについて普遍的に合意された定義はありませんが、複数の AI サービスの能力を連携・組み合わせることで、より複雑なタスクを達成できる AI を活用したアプリケーションを作成する方法として、いくつかのパターンが現れています。これらのパターンは、しばしば「エージェント型システム」または「エージェント型 AI」と呼ばれます。通常は、大規模言語モデル(LLM)を用いて、タスクの実行をオーケストレーションし、ツールの利用を管理し、対話をまたいでコンテキストを維持します。
Anthropic の研究者による最近の記事によれば、これらのエージェント型システムのアーキテクチャは、ワークフローと純粋なエージェントという 2 つの主なカテゴリに分類できます。
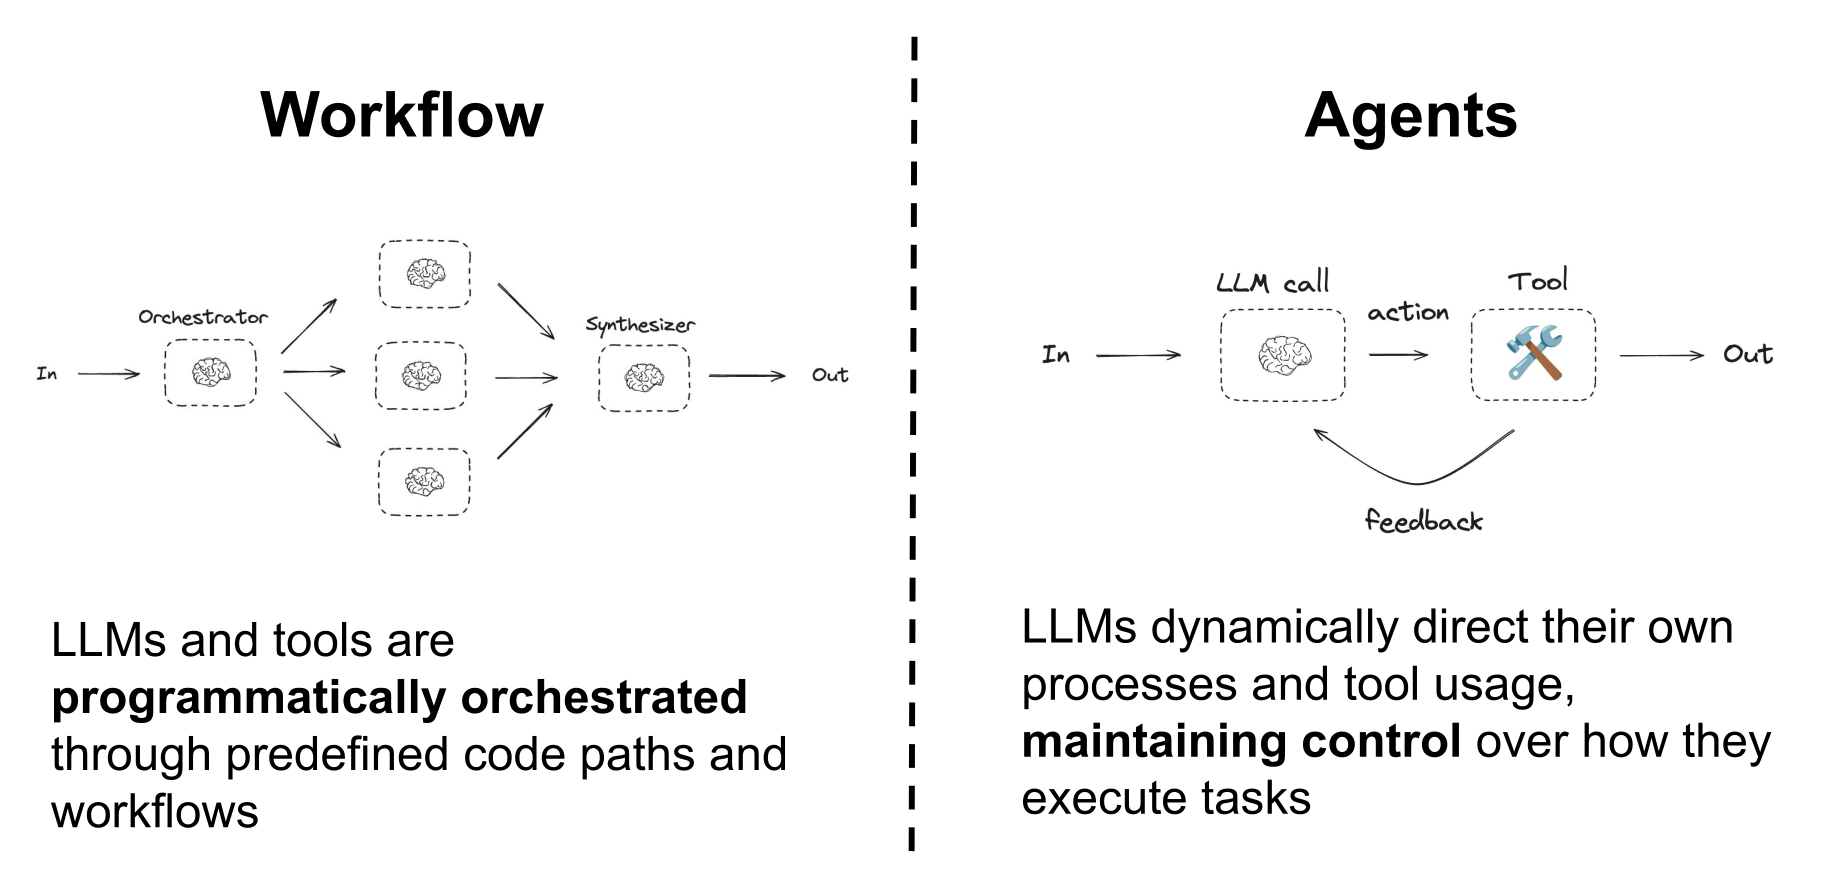
このチュートリアルで扱う langchain4j-agentic モジュールは、ワークフローおよび純粋なエージェント型 AI アプリケーションの構築を支援する抽象化とユーティリティ一式を提供します。ワークフローの定義、ツール利用の管理、異なる LLM との対話をまたいだコンテキストの維持を可能にします。
LangChain4j のエージェント
LangChain4j のエージェントは、LLM を使用して特定のタスクまたは一連のタスクを実行します。通常の AI サービスと同様に、単一メソッドを持つインターフェースとして定義でき、そこに @Agent アノテーションを追加するだけです。
public interface CreativeWriter {

    @UserMessage("""
            You are a creative writer.
            Generate a draft of a story no more than
            3 sentences long around the given topic.
            Return only the story and nothing else.
            The topic is {{topic}}.
            """)
    @Agent("Generates a story based on the given topic")
    String generateStory(@V("topic") String topic);
}
このアノテーションには、エージェントの目的を示す短い説明も付与することを推奨します。特に、他のエージェントがこのエージェントをいつどのように利用するかを適切に判断する必要がある純粋なエージェント型パターンでは重要です。この説明は、エージェントビルダーの description メソッドを使用して、プログラムから指定することもできます。
エージェントには、エージェント型システム内で一意に識別する名前も必要です。この名前は @Agent アノテーションで指定することも、エージェントビルダーの name メソッドを使用してプログラムから指定することもできます。指定しない場合は、@Agent が付与されたメソッド名が使用されます。
これで、インターフェースと使用するチャットモデルを指定して、AgenticServices.agentBuilder() メソッドによりこのエージェントのインスタンスを構築できます。
CreativeWriter creativeWriter = AgenticServices
        .agentBuilder(CreativeWriter.class)
        .chatModel(myChatModel)
        .outputKey("story")
        .build();
本質的に、エージェントは通常の AI サービスであり、同じ機能を提供します。ただし、他のエージェントと組み合わせて、より複雑なワークフローやエージェント型システムを作成できます。
AI サービスとのもう 1 つの主な違いは、エージェント呼び出しの結果を保存する共有変数の名前を指定する outputKey パラメータがあることです。これにより、同じエージェント型システム内の他のエージェントが結果を利用できます。代わりに、この例のようにプログラムから指定するのではなく、出力名を @Agent アノテーションで直接宣言することもできます。
@Agent(outputKey = "story", description = "Generates a story based on the given topic")
AgenticServices クラスは、langchain4j-agentic フレームワークで利用可能なあらゆる種類のエージェントを作成・定義するための静的ファクトリメソッド群を提供します。
AgenticScope の紹介
langchain4j-agentic モジュールは、エージェント型システムに参加するエージェント間で共有されるデータの集合である AgenticScope の概念を導入します。AgenticScope は共有変数を保存するために使われます。エージェントは生成した結果を伝えるために変数へ書き込み、別のエージェントは自身のタスクに必要な情報を組み立てるために変数を読み取れます。これにより、必要に応じて情報と結果を共有し、エージェントが効率的に協調できます。
AgenticScope は、すべてのエージェントの呼び出し順序と応答など、他の関連情報も自動的に登録します。エージェント型システムのメインエージェントが呼び出されると自動的に作成され、必要に応じてコールバックを通じてプログラムから提供されます。AgenticScope のさまざまな利用方法は、langchain4j-agentic が実装するエージェント型パターンを説明する際に、実践的な例で明らかにします。
ワークフローパターン
langchain4j-agentic モジュールは、複数のエージェントをプログラムからオーケストレーションし、エージェント型ワークフローパターンを作成するための抽象化一式を提供します。これらのパターンは組み合わせて、より複雑なワークフローを作成できます。
順次ワークフロー
順次ワークフローは最も単純なパターンで、複数のエージェントを順番に呼び出し、各エージェントの出力を次のエージェントへの入力として渡します。特定の順序で実行する必要がある一連のタスクに適しています。
たとえば、先に定義した CreativeWriter エージェントに、生成された物語を特定の読者層により適合するよう編集できる AudienceEditor エージェントを追加するとよいでしょう。
public interface AudienceEditor {

    @UserMessage("""
        You are a professional editor.
        Analyze and rewrite the following story to better align
        with the target audience of {{audience}}.
        Return only the story and nothing else.
        The story is "{{story}}".
        """)
    @Agent("Edits a story to better fit a given audience")
    String editStory(@V("story") String story, @V("audience") String audience);
}
さらに、特定のスタイルに対して同じ仕事を行う、非常によく似た StyleEditor も追加します。
public interface StyleEditor {

    @UserMessage("""
        You are a professional editor.
        Analyze and rewrite the following story to better fit and be more coherent with the {{style}} style.
        Return only the story and nothing else.
        The story is "{{story}}".
        """)
    @Agent("Edits a story to better fit a given style")
    String editStory(@V("story") String story, @V("style") String style);
}
このエージェントの入力引数には変数名のアノテーションが付与されていることに注意してください。実際には、エージェントに渡す引数の値を直接提供するのではなく、同じ名前を持つ AgenticScope の共有変数から取得します。これにより、エージェントはワークフロー内の前のエージェントの出力にアクセスできます。エージェントクラスを -parameters オプションを有効にしてコンパイルし、メソッドパラメータ名を実行時に保持している場合は、@V アノテーションを省略でき、変数名はパラメータ名から自動的に推論されます。
この時点で、これら 3 つのエージェントを組み合わせた順次ワークフローを作成できます。CreativeWriter の出力は AudienceEditor と StyleEditor の両方への入力として渡され、最終出力は編集済みの物語です。
CreativeWriter creativeWriter = AgenticServices
        .agentBuilder(CreativeWriter.class)
        .chatModel(BASE_MODEL)
        .outputKey("story")
        .build();

AudienceEditor audienceEditor = AgenticServices
        .agentBuilder(AudienceEditor.class)
        .chatModel(BASE_MODEL)
        .outputKey("story")
        .build();

StyleEditor styleEditor = AgenticServices
        .agentBuilder(StyleEditor.class)
        .chatModel(BASE_MODEL)
        .outputKey("story")
        .build();

UntypedAgent novelCreator = AgenticServices
        .sequenceBuilder()
        .subAgents(creativeWriter, audienceEditor, styleEditor)
        .outputKey("story")
        .build();

Map<String, Object> input = Map.of(
        "topic", "dragons and wizards",
        "style", "fantasy",
        "audience", "young adults"
);

String story = (String) novelCreator.invoke(input);
ここでの novelCreator エージェントは、3 つのサブエージェントを順番に呼び出して組み合わせる、順次ワークフローを実装したエージェント型システムです。このエージェントの定義には型付きインターフェースが提供されていないため、シーケンスエージェントビルダーは、入力マップで呼び出せる汎用エージェントである UntypedAgent インスタンスを返します。
public interface UntypedAgent {
    @Agent
    Object invoke(Map<String, Object> input);
}
その入力マップ内の値は AgenticScope の共有変数へコピーされるため、サブエージェントからアクセスできます。novelCreator エージェントの出力も、物語の作成・編集ワークフローの実行中に他のすべてのエージェントによって書き換えられた、"story" という名前の AgenticScope 共有変数から取得されます。
なお、型付きインターフェースを提供せず、単一のエージェントも UntypedAgent インスタンスとして定義できます。たとえば、CreativeWriter エージェントは次のように定義することも可能でした。
UntypedAgent creativeWriter = AgenticServices.agentBuilder()
        .chatModel(BASE_MODEL)
        .description("Generate a story based on the given topic")
        .userMessage("""
                You are a creative writer.
                Generate a draft of a story no more than
                3 sentences long around the given topic.
                Return only the story and nothing else.
                The topic is {{topic}}.
                """)
        .inputKey(String.class, "topic")
        .returnType(String.class) // String is the default return type for untyped agents
        .outputKey("story")
        .build();
一方、ワークフローエージェントにも、型の強い入力と出力で呼び出せるよう、任意で型付きインターフェースを提供できます。この場合、UntypedAgent インターフェースを次のようなより具体的なものに置き換えられます。
public interface NovelCreator {

    @Agent
    String createNovel(@V("topic") String topic, @V("audience") String audience, @V("style") String style);
}
これにより、novelCreator エージェントは次のように作成・使用できます。
NovelCreator novelCreator = AgenticServices
        .sequenceBuilder(NovelCreator.class)
        .subAgents(creativeWriter, audienceEditor, styleEditor)
        .outputKey("story")
        .build();

String story = novelCreator.createNovel("dragons and wizards", "young adults", "fantasy");
ループワークフロー
LLM の能力をより活用する一般的な方法は、物語などのテキストを編集・改善できるエージェントを繰り返し呼び出して、反復的に洗練することです。これは、特定の条件を満たすまでエージェントを複数回呼び出すループワークフローパターンで実現できます。
必要なスタイルとの整合性をスコアに基づいて評価する StyleScorer エージェントを使用できます。
public interface StyleScorer {

    @UserMessage("""
            You are a critical reviewer.
            Give a review score between 0.0 and 1.0 for the following
            story based on how well it aligns with the style '{{style}}'.
            Return only the score and nothing else.

            The story is: "{{story}}"
            """)
    @Agent("Scores a story based on how well it aligns with a given style")
    double scoreStyle(@V("story") String story, @V("style") String style);
}
次に、このエージェントを StyleEditor とループで使用し、スコアが 0.8 などのしきい値に達するか、最大反復回数に達するまで物語を反復的に改善できます。
StyleEditor styleEditor = AgenticServices
        .agentBuilder(StyleEditor.class)
        .chatModel(BASE_MODEL)
        .outputKey("story")
        .build();

StyleScorer styleScorer = AgenticServices
        .agentBuilder(StyleScorer.class)
        .chatModel(BASE_MODEL)
        .outputKey("score")
        .build();

UntypedAgent styleReviewLoop = AgenticServices
        .loopBuilder()
        .subAgents(styleScorer, styleEditor)
        .maxIterations(5)
        .exitCondition( agenticScope -> agenticScope.readState("score", 0.0) >= 0.8)
        .build();
ここで styleScorer エージェントは出力を "score" という名前の AgenticScope 共有変数に書き込み、ループの終了条件で同じ変数にアクセスして評価します。
exitCondition メソッドは引数として Predicate<AgenticScope> を受け取り、デフォルトでは各エージェント呼び出しの後に評価されます。これにより、呼び出し回数を可能な限り減らすため、条件が満たされるとすぐにループが終了します。ただし、ループの最後でのみ終了条件を確認し、条件をテストする前にすべてのエージェントを必ず呼び出すこともできます。その場合は、ループビルダーを testExitAtLoopEnd(true) メソッドで設定します。あるいは、exitCondition メソッドは第 2 引数として現在のループ反復回数を受け取る BiPredicate<AgenticScope, Integer> も受け取れます。たとえば、次のループ定義では、
UntypedAgent styleReviewLoop = AgenticServices
        .loopBuilder()
        .subAgents(styleScorer, styleEditor)
        .maxIterations(5)
        .testExitAtLoopEnd(true)
        .exitCondition( (agenticScope, loopCounter) -> {
            double score = agenticScope.readState("score", 0.0);
            return loopCounter <= 3 ? score >= 0.8 : score >= 0.6;
        })
        .build();
最初の 3 回の反復でスコアが少なくとも 0.8 ならループを終了し、それ以外では品質への期待を下げ、スコアが少なくとも 0.6 になった時点で終了します。また、終了条件が満たされた後でも、最後にもう一度 styleEditor エージェントを強制的に呼び出します。
この styleReviewLoop を設定した後は、単一のエージェントと見なして CreativeWriter エージェントとシーケンスに組み込み、StyledWriter エージェントを作成できます。
public interface StyledWriter {

    @Agent
    String writeStoryWithStyle(@V("topic") String topic, @V("style") String style);
}
これにより、物語生成とスタイルレビューのプロセスを組み合わせた、より複雑なワークフローを実装します。
CreativeWriter creativeWriter = AgenticServices
        .agentBuilder(CreativeWriter.class)
        .chatModel(BASE_MODEL)
        .outputKey("story")
        .build();

StyledWriter styledWriter = AgenticServices
        .sequenceBuilder(StyledWriter.class)
        .subAgents(creativeWriter, styleReviewLoop)
        .outputKey("story")
        .build();

String story = styledWriter.writeStoryWithStyle("dragons and wizards", "comedy");
並列ワークフロー
特に同じ入力に対して独立して作業できる場合、複数のエージェントを並列に呼び出すことが有用なことがあります。これは、複数のエージェントを同時に呼び出して出力を単一の結果に結合する、並列ワークフローパターンで実現できます。
たとえば、映画と食事を組み合わせて、指定されたムードに合う素敵な夜のプランをいくつか生成するために、映画と料理の専門家を使ってみましょう。
public interface FoodExpert {

    @UserMessage("""
        You are a great evening planner.
        Propose a list of 3 meals matching the given mood.
        The mood is {{mood}}.
        For each meal, just give the name of the meal.
        Provide a list with the 3 items and nothing else.
        """)
    @Agent
    List<String> findMeal(@V("mood") String mood);
}

public interface MovieExpert {

    @UserMessage("""
        You are a great evening planner.
        Propose a list of 3 movies matching the given mood.
        The mood is {mood}.
        Provide a list with the 3 items and nothing else.
        """)
    @Agent
    List<String> findMovie(@V("mood") String mood);
}
2 人の専門家の作業は独立しているため、次のように AgenticServices.parallelBuilder() メソッドを使用して並列に呼び出すことができます。
FoodExpert foodExpert = AgenticServices
        .agentBuilder(FoodExpert.class)
        .chatModel(BASE_MODEL)
        .outputKey("meals")
        .build();

MovieExpert movieExpert = AgenticServices
        .agentBuilder(MovieExpert.class)
        .chatModel(BASE_MODEL)
        .outputKey("movies")
        .build();

EveningPlannerAgent eveningPlannerAgent = AgenticServices
        .parallelBuilder(EveningPlannerAgent.class)
        .subAgents(foodExpert, movieExpert)
        .executor(Executors.newFixedThreadPool(2))
        .outputKey("plans")
        .output(agenticScope -> {
            List<String> movies = agenticScope.readState("movies", List.of());
            List<String> meals = agenticScope.readState("meals", List.of());

            List<EveningPlan> moviesAndMeals = new ArrayList<>();
            for (int i = 0; i < movies.size(); i++) {
                if (i >= meals.size()) {
                    break;
                }
                moviesAndMeals.add(new EveningPlan(movies.get(i), meals.get(i)));
            }
            return moviesAndMeals;
        })
        .build();

List<EveningPlan> plans = eveningPlannerAgent.plan("romantic");
ここで EveningPlannerAgent に定義した AgenticScope の output 関数により、2 つのサブエージェントの出力を組み立て、指定されたムードに合う映画と食事を組み合わせた EveningPlan オブジェクトのリストを作成できます。output メソッドは並列ワークフローで特に重要ですが、単に AgenticScope の値を返す代わりに、サブエージェントの出力を単一の結果へ結合する方法を定義するため、実際には任意のワークフローパターンで使用できます。executor メソッドでは、サブエージェントの並列実行に使用する Executor を任意で提供できます。指定しない場合、デフォルトで内部キャッシュスレッドプールが使用されます。
並列マッパーワークフロー
並列マッパーワークフローは、コレクション内の各項目に対して同じサブエージェントを 1 回ずつ並列に複数回実行する、並列ワークフローの変種です。言い換えると、リストのすべての項目をマッピングし、同じサブエージェントを複数回呼び出して各項目を独立して処理します。同じ操作を入力のバッチに同時適用する必要がある場合に便利です。
たとえば、人物のリストに対してパーソナライズされた星占いを生成するエージェントを作成しましょう。
public interface PersonAstrologyAgent {

    @SystemMessage("""
        You are an astrologist that generates horoscopes based on the user's name and zodiac sign.
        """)
    @UserMessage("""
        Generate the horoscope for {{person}}.
        The person has a name and a zodiac sign. Use both to create a personalized horoscope.
        """)
    @Agent(description = "An astrologist that generates horoscopes for a person", outputKey = "horoscope")
    String horoscope(@V("person") Person person);
}
AgenticServices.parallelMapperBuilder() を使用すると、コレクションに対してこのエージェントをファンアウトし、項目ごとに 1 インスタンスを自動作成するワークフローを作成できます。
PersonAstrologyAgent personAstrologyAgent = AgenticServices
        .agentBuilder(PersonAstrologyAgent.class)
        .chatModel(BASE_MODEL)
        .outputKey("horoscope")
        .build();

BatchHoroscopeAgent agent = AgenticServices
        .parallelMapperBuilder(BatchHoroscopeAgent.class)
        .subAgents(personAstrologyAgent)
        .itemsProvider("persons")
        .executor(Executors.newFixedThreadPool(3))
        .build();

List<Person> persons = List.of(
        new Person("Mario", "aries"),
        new Person("Luigi", "pisces"),
        new Person("Peach", "leo"));

List<String> horoscopes = agent.generateHoroscopes(persons);
BatchHoroscopeAgent は次のように定義します。
public interface BatchHoroscopeAgent extends AgentInstance {

    @Agent
    List<String> generateHoroscopes(@V("persons") List<Person> persons);
}
itemsProvider は、反復処理するコレクションを含む引数を指定します。ただし、この例のように曖昧さがなく、反復可能な引数(Collection または配列)が 1 つだけなら、安全に省略できます。サブエージェントの各インスタンスはコレクションから 1 項目を受け取り、すべてのインスタンスが完了すると、個々の結果が自動的にリストへ集約され、ワークフローの結果として返されます。並列ワークフローと同様に、Executor は任意で指定できます。
同じエージェントが異なる引数で同じタスクを繰り返し独立して実行するため、その ChatMemory を保持しても意味がないことに注意してください。このため、並列マッパーワークフローが ChatMemory を使用する設定のサブエージェントを使おうとすると、LangChain4j は例外をスローします。
条件付きワークフロー
特定の条件が満たされた場合にのみ、特定のエージェントを呼び出す必要もよくあります。たとえば、ユーザーリクエストを処理する前に分類すると、リクエストのカテゴリに応じて異なるエージェントで処理できます。これは、次の CategoryRouter を使用して実現できます。
public interface CategoryRouter {

    @UserMessage("""
        Analyze the following user request and categorize it as 'legal', 'medical' or 'technical'.
        In case the request doesn't belong to any of those categories categorize it as 'unknown'.
        Reply with only one of those words and nothing else.
        The user request is: '{{request}}'.
        """)
    @Agent("Categorizes a user request")
    RequestCategory classify(@V("request") String request);
}
これは RequestCategory 列挙値を返します。
public enum RequestCategory {
    LEGAL, MEDICAL, TECHNICAL, UNKNOWN
}
このように、次のような MedicalExpert エージェントと、
public interface MedicalExpert {

    @UserMessage("""
        You are a medical expert.
        Analyze the following user request under a medical point of view and provide the best possible answer.
        The user request is {{request}}.
        """)
    @Agent("A medical expert")
    String medical(@V("request") String request);
}
同様の LegalExpert および TechnicalExpert エージェントを定義すると、ExpertRouterAgent を作成できます。
public interface ExpertRouterAgent {

    @Agent
    String ask(@V("request") String request);
}
これは、ユーザーリクエストのカテゴリに基づいて適切なエージェントを呼び出す条件付きワークフローを実装します。
CategoryRouter routerAgent = AgenticServices
        .agentBuilder(CategoryRouter.class)
        .chatModel(BASE_MODEL)
        .outputKey("category")
        .build();

MedicalExpert medicalExpert = AgenticServices
        .agentBuilder(MedicalExpert.class)
        .chatModel(BASE_MODEL)
        .outputKey("response")
        .build();
LegalExpert legalExpert = AgenticServices
        .agentBuilder(LegalExpert.class)
        .chatModel(BASE_MODEL)
        .outputKey("response")
        .build();
TechnicalExpert technicalExpert = AgenticServices
        .agentBuilder(TechnicalExpert.class)
        .chatModel(BASE_MODEL)
        .outputKey("response")
        .build();

UntypedAgent expertsAgent = AgenticServices.conditionalBuilder()
        .subAgents( agenticScope -> agenticScope.readState("category", RequestCategory.UNKNOWN) == RequestCategory.MEDICAL, medicalExpert)
        .subAgents( agenticScope -> agenticScope.readState("category", RequestCategory.UNKNOWN) == RequestCategory.LEGAL, legalExpert)
        .subAgents( agenticScope -> agenticScope.readState("category", RequestCategory.UNKNOWN) == RequestCategory.TECHNICAL, technicalExpert)
        .build();

ExpertRouterAgent expertRouterAgent = AgenticServices
        .sequenceBuilder(ExpertRouterAgent.class)
        .subAgents(routerAgent, expertsAgent)
        .outputKey("response")
        .build();

String response = expertRouterAgent.ask("I broke my leg what should I do");
任意のエージェント
ワークフロー内のサブエージェントは、AgenticScope に入力引数が存在しない場合、実行する必要がないことがあります。デフォルトでは、エージェントが必要な引数のいずれかを見つけられないと、エージェント型システム全体が MissingArgumentException で失敗します。ただし、エージェントを任意としてマークすると、引数が欠けている場合にワークフロー全体を失敗させるのではなく、実行を暗黙にスキップできます。
これはエージェントビルダーの optional メソッドで行えます。たとえば、上で定義した順次ワークフローでは、AudienceEditor エージェントを任意にできます。これにより、入力に読者層が指定されていなくても、物語は生成されスタイル編集されます。
CreativeWriter creativeWriter = AgenticServices
        .agentBuilder(CreativeWriter.class)
        .chatModel(BASE_MODEL)
        .outputKey("story")
        .build();

AudienceEditor audienceEditor = AgenticServices
        .agentBuilder(AudienceEditor.class)
        .chatModel(BASE_MODEL)
        .optional(true)
        .outputKey("story")
        .build();

StyleEditor styleEditor = AgenticServices
        .agentBuilder(StyleEditor.class)
        .chatModel(BASE_MODEL)
        .outputKey("story")
        .build();

UntypedAgent novelCreator = AgenticServices
        .sequenceBuilder()
        .subAgents(creativeWriter, audienceEditor, styleEditor)
        .outputKey("story")
        .build();

// No "audience" key is provided, so the audienceEditor will be skipped
Map<String, Object> input = Map.of(
        "topic", "dragons and wizards",
        "style", "fantasy"
);

String story = (String) novelCreator.invoke(input);
ここで audienceEditor エージェントは任意として設定されています。入力マップには AudienceEditor が必要とする "audience" キーがないため、その呼び出しはスキップされ、ワークフローは直接 StyleEditor に進みます。同じエージェントは、@Agent アノテーション属性の @Agent(optional = true) を使用して宣言的に任意としてマークすることもできます。
非同期エージェント
デフォルトでは、すべてのエージェント呼び出しはエージェント型システムのルートエージェントを呼び出したのと同じスレッドで実行されるため、同期的です。つまり、エージェント型システムの実行は、次のエージェントに進む前に各エージェントの完了を待機します。しかし、多くの場合これは必要ではなく、エージェントを非同期に呼び出し、そのエージェントの完了を待たずにエージェント型システムの実行を続行すると便利です。
このため、エージェントビルダーの async メソッドを使用してエージェントを非同期として指定できます。指定すると、そのエージェントの呼び出しは別スレッドで実行され、エージェント型システムの実行は完了を待たずに続行します。非同期エージェントの結果は完了次第 AgenticScope で利用可能になり、別のエージェントの後続呼び出しへの入力として必要になった場合にのみ、AgenticScope はその結果を待ってブロックされます。
たとえば、並列ワークフローのセクションで扱った FoodExpert と MovieExpert は互いに独立しているため、各サブエージェントで .async(true) により非同期として指定すると、順次ワークフロー内で使用しても同時に実行されます。parallelBuilder() とは異なり、sequenceBuilder() には executor() メソッドがありません。任意の executor() は並列ワークフロー専用です。
FoodExpert foodExpert = AgenticServices
        .agentBuilder(FoodExpert.class)
        .chatModel(BASE_MODEL)
        .async(true)
        .outputKey("meals")
        .build();

MovieExpert movieExpert = AgenticServices
        .agentBuilder(MovieExpert.class)
        .chatModel(BASE_MODEL)
        .async(true)
        .outputKey("movies")
        .build();

EveningPlannerAgent eveningPlannerAgent = AgenticServices
        .sequenceBuilder(EveningPlannerAgent.class)
        .subAgents(foodExpert, movieExpert)
        .outputKey("plans")
        .output(agenticScope -> {
            List<String> movies = agenticScope.readState("movies", List.of());
            List<String> meals = agenticScope.readState("meals", List.of());

            List<EveningPlan> moviesAndMeals = new ArrayList<>();
            for (int i = 0; i < movies.size(); i++) {
                if (i >= meals.size()) {
                    break;
                }
                moviesAndMeals.add(new EveningPlan(movies.get(i), meals.get(i)));
            }
            return moviesAndMeals;
        })
        .build();

List<EveningPlan> plans = eveningPlannerAgent.plan("romantic");
ストリーミングエージェント
ストリーミングをサポートするため、TokenStream を返すエージェントを作成することもできます。
public interface StreamingCreativeWriter {

    @UserMessage("""
            You are a creative writer.
            Generate a draft of a story no more than
            3 sentences long around the given topic.
            Return only the story and nothing else.
            The topic is {{topic}}.
            """)
    @Agent("Generates a story based on the given topic")
    TokenStream generateStory(@V("topic") String topic);
}
次に StreamingChatModel を使用するよう設定すると、エージェント呼び出しの完了を待つ代わりに、生成中の結果を消費できます。
StreamingCreativeWriter creativeWriter = AgenticServices.agentBuilder(StreamingCreativeWriter.class)
        .streamingChatModel(streamingBaseModel())
        .outputKey("story")
        .build();

TokenStream tokenStream = creativeWriter.generateStory("dragons and wizards");
エージェント型システム内で使用する場合、ストリーミングエージェントは、最後に呼び出されるエージェントである場合にのみストリーミング応答をシステム全体へ伝播できます。それ以外の場合は非同期エージェントのように動作するため、後続のエージェントは結果を取得・使用するためにストリーミング応答の完了を待つ必要があります。
たとえば、次の StreamingReviewedWriter エージェントは、
public interface StreamingReviewedWriter {
    @Agent
    TokenStream writeStory(@V("topic") String topic, @V("audience") String audience, @V("style") String style);
}
3 つのストリーミングエージェントのシーケンスで実装されます。
StreamingCreativeWriter creativeWriter = AgenticServices.agentBuilder(StreamingCreativeWriter.class)
        .streamingChatModel(streamingBaseModel())
        .outputKey("story")
        .build();

StreamingAudienceEditor audienceEditor = AgenticServices.agentBuilder(StreamingAudienceEditor.class)
        .streamingChatModel(streamingBaseModel())
        .outputKey("story")
        .build();

StreamingStyleEditor styleEditor = AgenticServices.agentBuilder(StreamingStyleEditor.class)
        .streamingChatModel(streamingBaseModel())
        .outputKey("story")
        .build();

StreamingReviewedWriter novelCreator = AgenticServices.sequenceBuilder(StreamingReviewedWriter.class)
        .subAgents(creativeWriter, audienceEditor, styleEditor)
        .outputKey("story")
        .build();
この novelCreator エージェントを呼び出すと、
TokenStream tokenStream = novelCreator.writeStory("dragons and wizards", "young adults", "fantasy");
後続エージェントの呼び出しを開始できる前に、最初の 2 エージェントのストリーミング応答は内部的に完全に消費され、最後の StyleEditor エージェントのストリーミング応答だけが novelCreator エージェント全体のストリーミング応答として伝播されます。
動的なチャットモデル選択
デフォルトでは、エージェントはビルド時に単一の ChatModel にバインドされます。しかし、エージェント型システムの現在の状態に基づき、呼び出しごとに使用するモデルを動的に選択したい場合があります。たとえば、定常的な作業には安価で高速なモデルを使用し、品質しきい値が求める場合にはより高性能なモデルに切り替えることができます。
AgentBuilder の chatModel メソッドには、Function<AgenticScope, ChatModel> を受け取るオーバーロードがあります。
StoryEditor storyEditor = AgenticServices.agentBuilder(StoryEditor.class)
        .chatModel(scope -> {
            CritiqueResult critique = (CritiqueResult) scope.readState("critique");
            return critique != null && critique.score() > 7.8 ? enhancedModel() : baseModel();
        })
        .outputKey("story")
        .build();
この関数は現在の AgenticScope を受け取り、現在の呼び出しに使用する ChatModel を返します。この例では、StoryEditor エージェントは編集対象の物語の批評スコアが 7.8 未満で、まだ多くの改善が必要な場合にはデフォルトで baseModel() を使用します。スコアがそのしきい値を超え、最終調整により良いモデルが必要な場合は enhancedModel() に切り替えます。この関数は呼び出しのたびに評価されるため、同じエージェントでも呼び出し間でモデルを変更できます。
同じ動的選択は streamingChatModel メソッドでも可能です。
エラー処理
複雑なエージェント型システムでは、エージェントが結果を生成できない、外部ツールが利用できない、エージェントの実行中に予期しないエラーが発生するなど、多くの問題が起こり得ます。
このため、errorHandler メソッドにより、次のように定義される ErrorContext を変換する関数を、エージェント型システムのエラーハンドラーとして提供できます。
record ErrorContext(String agentName, AgenticScope agenticScope, AgentInvocationException exception) { }
変換先の ErrorRecoveryResult には、次の 3 つの可能性があります。
ErrorRecoveryResult.throwException():デフォルトの動作です。問題を引き起こしたExceptionをルート呼び出し元まで単純に伝播します。ErrorRecoveryResult.retry():必要に応じて修正アクションを実行した後、エージェント呼び出しを再試行します。ErrorRecoveryResult.result(Object result):問題を無視し、指定された結果を失敗したエージェントの成果として返します。
たとえば、順次ワークフローの最初の例で必要な引数が省略されると、
UntypedAgent novelCreator = AgenticServices
        .sequenceBuilder()
        .subAgents(creativeWriter, audienceEditor, styleEditor)
        .outputKey("story")
        .build();

Map<String, Object> input = Map.of(
        // missing "topic" entry to trigger an error
        // "topic", "dragons and wizards",
        "style", "fantasy",
        "audience", "young adults"
);
実行は次のような例外で失敗します。
dev.langchain4j.agentic.agent.MissingArgumentException: Missing argument: topic
この場合、この問題を解決するには、次のように不足した引数を agenticScope に提供する適切な errorHandler を設定して、このエラーを処理・回復できます。
UntypedAgent novelCreator = AgenticServices.sequenceBuilder()
        .subAgents(creativeWriter, audienceEditor, styleEditor)
        .errorHandler(errorContext -> {
            if (errorContext.agentName().equals("generateStory") &&
                    errorContext.exception() instanceof MissingArgumentException mEx && mEx.argumentName().equals("topic")) {
                errorContext.agenticScope().writeState("topic", "dragons and wizards");
                errorRecoveryCalled.set(true);
                return ErrorRecoveryResult.retry();
            }
            return ErrorRecoveryResult.throwException();
        })
        .outputKey("story")
        .build();
エージェント間補償
エージェント型システムがツールを通じて副作用(データベースへの書き込み、API 呼び出し、金融取引など)を実行する場合、ワークフローの途中で失敗するとシステムが不整合な状態になる可能性があります。エージェント間補償はこの問題を解決、または少なくとも軽減しようとします。階層内の任意のエージェントが失敗すると、@CompensateFor アクションを持つ以前に成功したツール呼び出しがすべて逆順に補償されます。
これはエージェント単位の @CompensateFor メカニズム(ツールを参照)を基盤とします。エージェント単位の補償は単一エージェント内のツールエラーを処理するのに対し、エージェント間補償は階層全体にまたがるエージェントレベルの失敗を処理します。
この機能を有効にするには、合成エージェントビルダーで compensateOnError(true) を設定します。
UntypedAgent transferWorkflow = AgenticServices.sequenceBuilder()
        .subAgents(creditAgent, debitAgent, notificationAgent)
        .compensateOnError(true)
        .outputKey("result")
        .build();
notificationAgent が例外をスローすると、@CompensateFor メソッドを持つ creditAgent と debitAgent が呼び出したツールは、時系列の逆順(最後に実行されたものから先)で補償されます。
@CompensateFor アノテーションのないツールは、補償中に単にスキップされます。
補償アクションは、エージェント単位のツール補償と同じ @CompensateFor を使用してツールクラスに定義します。
public class AccountService {

    @Tool("Credits the given amount to the account")
    String credit(@P(name = "amount") int amount) {
        // perform the credit
        return "credited " + amount;
    }

    @CompensateFor("credit")
    void reverseCredit(int amount) {
        // reverse the credit
    }
}
補償アクションはベストエフォート方針で実行されることに注意してください。いずれかが失敗してもエラーはログに記録され、残りの補償は続行されます。
可観測性
エージェントの呼び出しを追跡・ログ記録することは、デバッグや、エージェントが参加するエージェント型システム全体の集約動作を理解するうえで非常に重要です。このため、langchain4j-agentic モジュールでは、エージェントビルダーの listener メソッドを通じて AgentListener を登録できます。このリスナーはすべてのエージェント呼び出しとその結果について通知を受け、次のように定義されます。
public interface AgentListener {

    default void beforeAgentInvocation(AgentRequest agentRequest) { }
    default void afterAgentInvocation(AgentResponse agentResponse) { }
    default void onAgentInvocationError(AgentInvocationError agentInvocationError) { }

    default void afterAgenticScopeCreated(AgenticScope agenticScope) { }
    default void beforeAgenticScopeDestroyed(AgenticScope agenticScope) { }

    default void beforeToolExecution(BeforeToolExecution beforeToolExecution) { }
    default void afterToolExecution(ToolExecution toolExecution) { }

    default boolean inheritedBySubagents() {
        return false;
    }
}
このインターフェースのすべてのメソッドにはデフォルトの空実装があるため、関心のあるメソッドだけを実装できます。これにより、将来のリリースで新しいメソッドが追加されても既存の実装を壊さずに済みます。
たとえば、次の CreativeWriter エージェントの設定では、呼び出されたときと、生成した物語をコンソールにログ出力します。
CreativeWriter creativeWriter = AgenticServices.agentBuilder(CreativeWriter.class)
        .chatModel(baseModel())
        .outputKey("story")
        .listener(new AgentListener() {
            @Override
            public void beforeAgentInvocation(AgentRequest request) {
                System.out.println("Invoking CreativeWriter with topic: " + request.inputs().get("topic"));
            }

            @Override
            public void afterAgentInvocation(AgentResponse response) {
                System.out.println("CreativeWriter generated this story: " + response.output());
            }
        })
        .build();
これらのリスナーメソッドは、それぞれ AgentRequest と AgentResponse を引数として受け取ります。これらはエージェントの名前、受け取った入力、生成した出力、さらにその呼び出しに使用された AgenticScope のインスタンスなど、エージェント呼び出しに関する有用な情報を提供します。これらのメソッドはエージェント呼び出しを実行するスレッドと同じスレッドで呼び出されるため、呼び出しと同期的であり、長時間ブロックする処理を実行すべきではありません。
AgentListener には次の 2 つの重要な性質があります。
- 合成可能:
listenerメソッドを複数回呼び出すことで同じエージェントに複数のリスナーを登録でき、登録順に通知されます。 - 任意で階層的:デフォルトでは直接登録されたエージェントに対してのみローカルですが、
inheritedBySubagentsメソッドがtrueを返すようにするだけで、すべてのサブエージェントに継承させることもできます。この場合、トップレベルエージェントに登録したリスナーは、任意のレベルにあるすべてのサブエージェントの呼び出しについても通知を受け、それらのサブエージェントが独自に登録している可能性のあるすべてのリスナーと合成されます。
モニタリング
AgentListener インターフェースが提供する可観測性機能を活用し、langchain4j-agentic モジュールはこのインターフェースの組み込み実装である AgentMonitor も提供します。これはすべてのサブエージェントに継承されるよう設定されており、すべてのエージェント呼び出しをインメモリのツリー構造に記録することを目的とします。これにより、エージェント型システムの実行中または実行後に、呼び出しの順序とその結果を調べられます。このモニターは、エージェントビルダーの listener メソッドを使用して、エージェント型システムのルートエージェントにリスナーとして登録できます。
より包括的な例として、必要なスタイル品質に達するまで物語を生成して反復的に洗練するループワークフローを再考し、AgentMonitor を含むいくつかのリスナーを登録してみましょう。
AgentMonitor monitor = new AgentMonitor();

CreativeWriter creativeWriter = AgenticServices.agentBuilder(CreativeWriter.class)
        .listener(new AgentListener() {
            @Override
            public void beforeAgentInvocation(AgentRequest request) {
                System.out.println("Invoking CreativeWriter with topic: " + request.inputs().get("topic"));
            }
        })
        .chatModel(baseModel())
        .outputKey("story")
        .build();

StyleEditor styleEditor = AgenticServices.agentBuilder(StyleEditor.class)
        .chatModel(baseModel())
        .outputKey("story")
        .build();

StyleScorer styleScorer = AgenticServices.agentBuilder(StyleScorer.class)
        .name("styleScorer")
        .chatModel(baseModel())
        .outputKey("score")
        .build();

UntypedAgent styleReviewLoop = AgenticServices.loopBuilder()
        .subAgents(styleScorer, styleEditor)
        .maxIterations(5)
        .exitCondition(agenticScope -> agenticScope.readState("score", 0.0) >= 0.8)
        .build();

UntypedAgent styledWriter = AgenticServices.sequenceBuilder()
        .subAgents(creativeWriter, styleReviewLoop)
        .listener(monitor)
        .listener(new AgentListener() {
            @Override
            public void afterAgentInvocation(AgentResponse response) {
                if (response.agentName().equals("styleScorer")) {
                    System.out.println("Current score: " + response.output());
                }
            }
        })
        .outputKey("story")
        .build();
ここでは、最初のリスナーを creativeWriter エージェントに直接登録しているため、そのエージェントが呼び出された場合にのみ、生成する物語のリクエストトピックをログに記録します。2 番目のリスナーはトップレベルの styledWriter エージェントに登録されているため、そのエージェントの階層内の任意レベルにあるすべてのサブエージェントについても呼び出されます。そのため、このリスナーの afterAgentInvocation メソッドは、呼び出されるエージェントが styleScorer であるか確認し、その場合にのみ生成された物語のスタイルに割り当てられた現在のスコアをログに記録します。
最後に、AgentMonitor インスタンスも styledWriter トップレベルエージェントの追加リスナーとして登録され、他の 2 つのリスナーと自動的に合成されます。これにより、エージェント型システム全体のすべてのエージェント呼び出しを追跡できます。
次のように styledWriter エージェントを呼び出すと、
Map<String, Object> input = Map.of(
        "topic", "dragons and wizards",
        "style", "comedy");
String story = styledWriter.invoke(input);
AgentMonitor は、各エージェント呼び出しの開始時刻、終了時刻、所要時間、トークン、入力、出力も追跡するツリー構造に、すべてのエージェント呼び出しを記録します。この時点でモニターから記録された実行を取得し、たとえば調査のためにコンソールへ出力できます。
MonitoredExecution execution = monitor.successfulExecutions().get(0);
System.out.println(execution);
これにより、物語の生成と洗練に必要な、ネストされたエージェント呼び出しのシーケンスが次のように表示されます。
AgentInvocation{agent=Sequential, startTime=2026-03-18T17:27:28.099439515, finishTime=2026-03-18T17:27:38.683498783, duration=10584 ms, tokens=0, inputs={topic=dragons and wiz..., style=comedy}, output=In a realm wher...}
|=> AgentInvocation{agent=generateStory, startTime=2026-03-18T17:27:28.1.18.1287, finishTime=2026-03-18T17:27:31.033561726, duration=2932 ms, tokens=127, inputs={topic=dragons and wiz...}, output=In a realm wher...}
|=> AgentInvocation{agent=reviewLoop, startTime=2026-03-18T17:27:31.035952285, finishTime=2026-03-18T17:27:38.683438433, duration=7647 ms, tokens=0, inputs={score=0.8, topic=dragons and wiz..., style=comedy, story=In a realm wher...}, output=null}
    |=> AgentInvocation{agent=scoreStyle, iteration=0, startTime=2026-03-18T17:27:31.036155107, finishTime=2026-03-18T17:27:31.671478699, duration=635 ms, tokens=152, inputs={style=comedy, story=In a realm wher...}, output=0.2}
    |=> AgentInvocation{agent=editStory, iteration=0, startTime=2026-03-18T17:27:31.671711250, finishTime=2026-03-18T17:27:38.182881941, duration=6511 ms, tokens=491, inputs={style=comedy, story=In a realm wher...}, output=In a realm wher...}
    |=> AgentInvocation{agent=scoreStyle, iteration=1, startTime=2026-03-18T17:27:38.183021641, finishTime=2026-03-18T17:27:38.683085876, duration=500 ms, tokens=439, inputs={style=comedy, story=In a realm wher...}, output=0.8}
最後に、HtmlReportGenerator クラスが公開する静的 generateReport メソッドを使用すると、エージェント型システムのトポロジーと記録された実行の両方について、AgentMonitor が収集したデータの視覚的な HTML レポートを生成することもできます。たとえば、先ほどの実行に対してこのレポートを生成すると、
HtmlReportGenerator.generateReport(monitor, Path.of("review-loop.html"));
現在の作業ディレクトリに、次のような review-loop.html レポートファイルが生成されます。
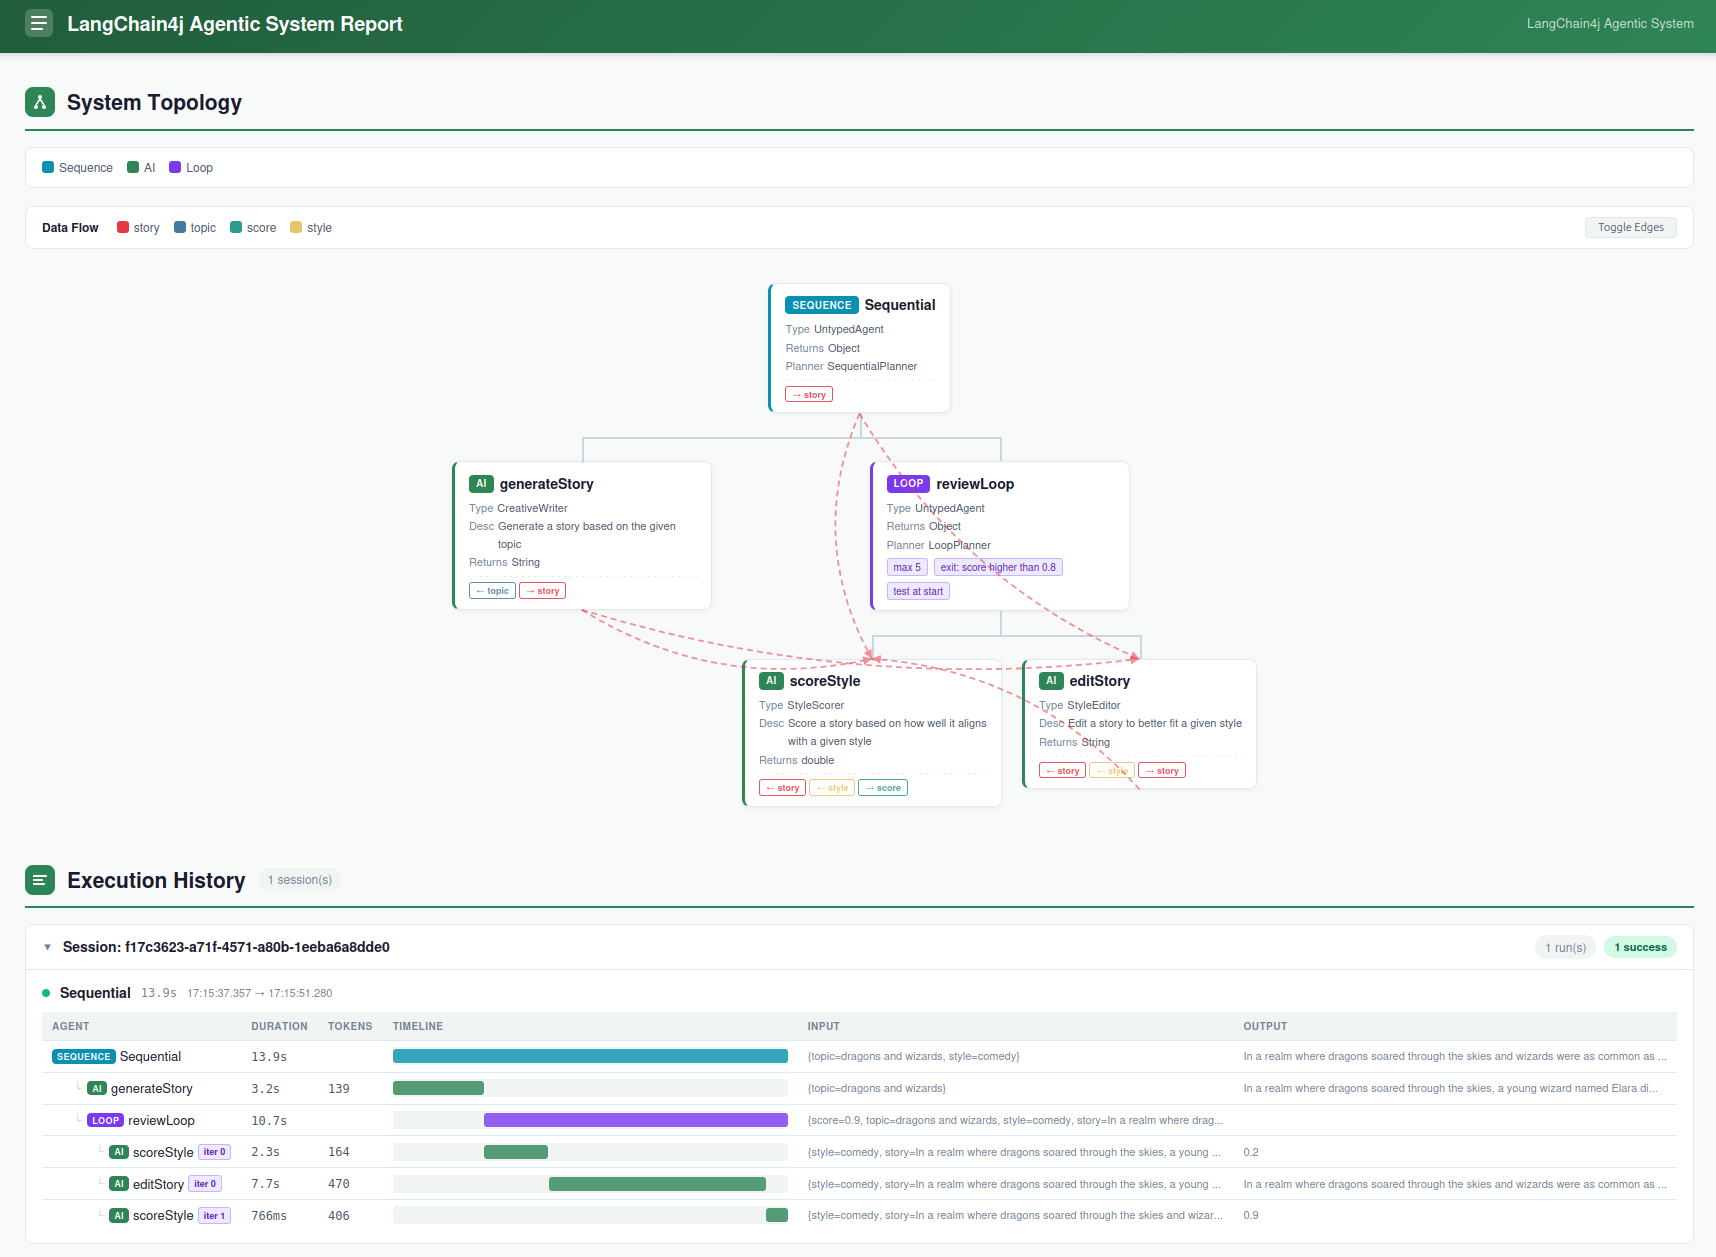
トポロジーと実行のセクションを個別に生成することもできます。実行データなしで、エージェント型システムのトポロジーのみを生成するには、次のようにします。
HtmlReportGenerator.generateTopology(styledWriter, Path.of("topology.html"));
逆に、トポロジーセクションなしでモニターが記録した実行履歴のみを生成するには、次のようにします。
HtmlReportGenerator.generateExecution(monitor, Path.of("execution.html"));
この最後のメソッドは、たとえば HtmlReportGenerator.generateExecution(monitor, memoryId, path) のようにメモリー ID によるフィルタリングもサポートします。また、すべてのメソッドには、ファイルへ書き込む代わりに HTML を String として返すオーバーロードがあります。
デフォルトでは、AgentMonitor は結果ごとに最大 100 セッション(異なるメモリー ID。成功と失敗は独立)を保持します。上限を超えると、最も古いセッションが自動的に削除されます。そのため、メモリー使用量が際限なく増加する危険なく、長寿命のシングルトンエージェントにモニターを安全に追加できます。
保持上限は setMaxRetainedSessions を介していつでも変更できます。新しい上限が現在保持しているセッション数より少ない場合、超過したエントリは即座に削除されます。
monitor.setMaxRetainedSessions(20);
0 に設定すると保持は完全に無効になります。リスナーのコールバックは引き続き発生しますが、メモリーには何も保持されません。保持済みの全セッションを明示的に削除するには、clear() メソッドを使用します。
monitor.clear();
どちらの操作も、進行中(in-flight)の実行には影響しません。
AgentMonitor を手動で作成してリスナーとして登録する代わりに、エージェントサービスインターフェースを MonitoredAgent から継承させることもできます。そうすると、ビルダーは AgentMonitor を自動作成してリスナーとして登録し、このモニターは agentMonitor() メソッドを介してエージェントインスタンスから直接アクセスできるようになります。
たとえば、前の例で定義したシーケンスエージェントは、MonitoredAgent インターフェースも継承する StyledWriter インターフェースを定義することで、型付きかつ監視対象のエージェントに変換できます。
public interface StyledWriter extends MonitoredAgent {
    @Agent("Write a creative story about the given topic")
    String generateStoryWithStyle(@V("topic") String topic, @V("style") String style);
}
このエージェントをビルドする際に、AgentMonitor を明示的に作成または登録する必要はありません。
StyledWriter styledWriter = AgenticServices.sequenceBuilder(StyledWriter.class)
        .subAgents(creativeWriter, styleReviewLoop)
        .outputKey("story")
        .build();
モニターは自動的に登録され、いつでもエージェント自身から取得できます。
AgentMonitor monitor = styledWriter.agentMonitor();
宣言的 API
ここまでで説明したすべてのワークフローパターンは、より簡潔で読みやすい方法でワークフローを定義できる宣言的 API を使用して定義できます。langchain4j-agentic モジュールは、より宣言的なスタイルでエージェントとそのワークフローを定義するために使用できるアノテーション一式を提供します。
たとえば、前のセクションでプログラムから定義した並列ワークフローを実装する EveningPlannerAgent は、宣言的 API を使用して次のように書き換えられます。
public interface EveningPlannerAgent {

    @ParallelAgent( outputKey = "plans",
            subAgents = { FoodExpert.class, MovieExpert.class })
    List<EveningPlan> plan(@V("mood") String mood);

    @ParallelExecutor
    static Executor executor() {
        return Executors.newFixedThreadPool(2);
    }

    @Output
    static List<EveningPlan> createPlans(@V("movies") List<String> movies, @V("meals") List<String> meals) {
        List<EveningPlan> moviesAndMeals = new ArrayList<>();
        for (int i = 0; i < movies.size(); i++) {
            if (i >= meals.size()) {
                break;
            }
            moviesAndMeals.add(new EveningPlan(movies.get(i), meals.get(i)));
        }
        return moviesAndMeals;
    }
}
この場合、@Output が付与された静的メソッドは、AgenticScope の関数を output メソッドへ渡して行ったのとまったく同じように、サブエージェントの出力を単一の結果へ結合する方法を定義するために使用されます。
このインターフェースを定義すると、AgenticServices.createAgenticSystem() メソッドを使用して EveningPlannerAgent のインスタンスを作成でき、その後は以前とまったく同じように使用できます。
EveningPlannerAgent eveningPlannerAgent = AgenticServices
        .createAgenticSystem(EveningPlannerAgent.class, BASE_MODEL);
List<EveningPlan> plans = eveningPlannerAgent.plan("romantic");
@Output アノテーションについて示したのと同様に、エージェントパターンを定義するインターフェース内の他の static メソッドに以下のアノテーションのいずれかを付与することで、たとえば並列エージェントに使用する executor、ループエージェントの終了条件など、エージェント型システムを宣言的に設定できます。この目的で利用できるアノテーションの一覧を次に示します。
| アノテーション名 | 説明 |
|---|---|
@Output | このエージェント型パターンが返す出力を、AgenticScope の異なる状態を組み合わせて組み立てます。 |
@ActivationCondition | ConditionalAgent でのみ利用でき、1 つ以上のサブエージェントの有効化述語を定義します。boolean を返す必要があります。 |
@BeforeCall | このエージェント型パターンの呼び出し前に実行するアクションです。AgenticScope の状態を初期化するのに役立ちます。 |
@ErrorHandler | エージェントの動作中にエラーが発生した場合に呼び出すアクションで、カスタムのエラー処理ロジックを可能にします。 |
@ExitCondition | LoopAgent でのみ利用でき、ループの終了述語を定義します。boolean を返す必要があります。 |
@ParallelExecutor | ParallelAgent および ParallelMapperAgent でのみ利用でき、サブエージェントの並列実行に使用する executor を指定します。 |
@AgentListenerSupplier | このエージェント型パターンに登録された AgentListener を返します。 |
@PlannerSupplier | このエージェント型パターンが使用する Planner 実装を返します。 |
@SupervisorRequest | SupervisorAgent でのみ利用でき、スーパーバイザーに送信するリクエストを定義します。 |
前の例では、AgenticServices.createAgenticSystem() メソッドに、このエージェント型システム内のすべてのサブエージェントの作成にデフォルトで使用される ChatModel も指定しています。しかし、特定のサブエージェントに別の ChatModel を任意で指定することも可能です。その定義に、使用する ChatModel を返す @ChatModelSupplier が付与された静的メソッドを追加します。たとえば、FoodExpert エージェントは次のように独自の ChatModel を定義できます。
public interface FoodExpert {

    @UserMessage("""
        You are a great evening planner.
        Propose a list of 3 meals matching the given mood.
        The mood is {{mood}}.
        For each meal, just give the name of the meal.
        Provide a list with the 3 items and nothing else.
        """)
    @Agent(outputKey = "meals")
    List<String> findMeal(@V("mood") String mood);

    @ChatModelSupplier
    static ChatModel chatModel() {
        return FOOD_MODEL;
    }
}
同様に、エージェントインターフェース内の他の static メソッドにアノテーションを付与することで、チャットメモリーや利用できるツールなど、エージェントの他の側面を宣言的に設定できます。前のアノテーション一覧はエージェント型パターンにのみ適用されますが、以下のアノテーションは、エージェント型パターンと最終エージェントの両方にリスナーを登録できる @AgentListenerSupplier を除き、LLM ベースの最終エージェントにのみ使用するのが適切です。また、スーパーバイザーパターンは内部的に LLM を使用する唯一のものなので、@ChatModelSupplier や @ChatMemoryProviderSupplier など、スーパーバイザー自身が使用する ChatModel を設定できるアノテーションを使用できます。以下の表で別途指定されていない限り、これらのメソッドは引数を持たない必要があります。この目的で利用できるアノテーションの一覧を次に示します。
| アノテーション名 | 説明 |
|---|---|
@ChatModelSupplier | このエージェントが使用する ChatModel を返します。メソッドに引数がなければ固定モデル、AgenticScope の関数であれば動的モデルにできます。 |
@StreamingChatModelSupplier | このエージェントが使用する StreamingChatModel を返します。メソッドに引数がなければ固定モデル、AgenticScope の関数であれば動的モデルにできます。 |
@ChatMemorySupplier | このエージェントが使用する ChatMemory を返します。 |
@ChatMemoryProviderSupplier | このエージェントが使用する ChatMemoryProvider を返します。このメソッドには、作成するメモリーの memoryId として使用する Object が引数として必要です。 |
@ContentRetrieverSupplier | このエージェントが使用する ContentRetriever を返します。 |
@AgentListenerSupplier | このエージェントが使用する AgentListener を返します。 |
@RetrievalAugmentorSupplier | このエージェントが使用する RetrievalAugmentor を返します。 |
@ToolsSupplier | このエージェントが使用するツールまたはツールセットを返します。 単一の Object または Object[] を返せます。 |
@ToolProviderSupplier | このエージェントが使用する ToolProvider を返します。 |
@SystemMessageProviderSupplier | 動的なシステムメッセージを提供します。メソッドは memoryId を Object として受け取り、String を返します。 |
@UserMessageProviderSupplier | 動的なユーザーメッセージを提供します。メソッドは memoryId を Object として受け取り、String を返します。 |
この宣言的 API の別の例として、条件付きワークフローのセクションで示した ExpertsAgent をこれを通じて再定義してみましょう。
public interface ExpertsAgent {

    @ConditionalAgent(outputKey = "response",
            subAgents = { MedicalExpert.class, TechnicalExpert.class, LegalExpert.class })
    String askExpert(@V("request") String request);

    @ActivationCondition(MedicalExpert.class)
    static boolean activateMedical(@V("category") RequestCategory category) {
        return category == RequestCategory.MEDICAL;
    }

    @ActivationCondition(TechnicalExpert.class)
    static boolean activateTechnical(@V("category") RequestCategory category) {
        return category == RequestCategory.TECHNICAL;
    }

    @ActivationCondition(LegalExpert.class)
    static boolean activateLegal(@V("category") RequestCategory category) {
        return category == RequestCategory.LEGAL;
    }
}
この場合、@ActivationCondition アノテーションの値は、そのアノテーションが付けられたメソッドが true を返すときにアクティブ化されるエージェント クラスのセットを指します。
エージェントおよびエージェント システムを定義するプログラム スタイルと宣言スタイルを混合して、部分的にアノテーションを使用してエージェントを構成し、部分的にエージェント ビルダーを使用してエージェントを構成することもできることに注意してください。また、エージェントを宣言的に完全に定義し、そのエージェントのクラスをサブエージェントとして使用してエージェント システムをプログラム的に実装することもできます。たとえば、次のように CreativeWriter エージェントと AudienceEditor エージェントを宣言的に定義することができます。
public interface CreativeWriter {

    @UserMessage("""
            You are a creative writer.
            Generate a draft of a story long no more than 3 sentence around the given topic.
            Return only the story and nothing else.
            The topic is {{topic}}.
            """)
    @Agent(description = "Generate a story based on the given topic", outputKey = "story")
    String generateStory(@V("topic") String topic);

    @ChatModelSupplier
    static ChatModel chatModel() {
        return baseModel();
    }
}

public interface AudienceEditor {

    @UserMessage("""
        You are a professional editor.
        Analyze and rewrite the following story to better align with the target audience of {{audience}}.
        Return only the story and nothing else.
        The story is "{{story}}".
        """)
    @Agent(description = "Edit a story to better fit a given audience", outputKey = "story")
    String editStory(@V("story") String story, @V("audience") String audience);

    @ChatModelSupplier
    static ChatModel chatModel() {
        return baseModel();
    }
}
次に、それらのクラスをサブエージェントとして使用するだけで、それらをプログラムでシーケンス内に連結します。
UntypedAgent novelCreator = AgenticServices.sequenceBuilder()
        .subAgents(CreativeWriter.class, AudienceEditor.class)
        .outputKey("story")
        .build();

Map<String, Object> input = Map.of(
        "topic", "dragons and wizards",
        "audience", "young adults"
);

String story = (String) novelCreator.invoke(input);
厳密に型指定された入力と出力
この時点まで、エージェントとの間でデータの受け渡しに使用されるすべての入力キーと出力キーは、単純な String によって識別されていました。ただし、このアプローチはキーの正しいスペルに依存するため、間違いが発生しやすい可能性があります。また、この方法では、これらの変数を特定の型に強くバインドすることはできないため、AgenticScope から値を読み取るときに型チェックとキャストが必要になります。これらの問題を回避するために、TypedKey インターフェイスを使用して、厳密に型指定された入力キーと出力キーを定義することがオプションで許可されます。
たとえば、このアプローチに従って、条件付きワークフローを提示するときに説明したエキスパート ルーティングの例で使用される入力キーと出力キーを次のように定義できます。
public static class UserRequest implements TypedKey<String> { }

public static class ExpertResponse implements TypedKey<String> { }

public static class Category implements TypedKey<RequestCategory> {
    @Override
    public Category defaultValue() {
        return Category.UNKNOWN;
    }
}
ここで、UserRequest キーと ExpertResponse キーは両方とも String として厳密に型指定されていますが、Category キーは RequestCategory 列挙型として型指定されており、そのキーが AgenticScope に存在しない場合に使用されるデフォルト値も提供します。これらの入力されたキーを使用すると、ユーザーのリクエストを分類するために使用される CategoryRouter エージェントを次のように再定義できます。
public interface CategoryRouter {

    @UserMessage("""
        Analyze the following user request and categorize it as 'legal', 'medical' or 'technical'.
        In case the request doesn't belong to any of those categories categorize it as 'unknown'.
        Reply with only one of those words and nothing else.
        The user request is: '{{UserRequest}}'.
        """)
    @Agent(description = "Categorizes a user request", typedOutputKey = Category.class)
    RequestCategory classify(@K(UserRequest.class) String request);
}
classify メソッドの引数には @K 注釈が付けられ、その値が UserRequest 型付きキーで識別される AgenticScope 変数から取得される必要があることを示します。同様に、このエージェントの出力は、Category 型付きキーによって識別される AgenticScope 変数に書き込まれます。プロンプト テンプレートも、入力されたキーの名前を使用するように更新されていることに注意してください。これは、デフォルトでは、TypedKey インターフェイスを実装するクラスの単純名 (この場合は {{UserRequest}}) に対応しますが、この規則は、TypedKey インターフェイスの name() メソッドを実装することによってもオーバーライドできます。同様の方法で、3 つのエキスパート エージェントのうちの 1 つである MedicalExpert を次のように再定義できます。
public interface MedicalExpert {

    @UserMessage("""
        You are a medical expert.
        Analyze the following user request under a medical point of view and provide the best possible answer.
        The user request is {{UserRequest}}.
        """)
    @Agent("A medical expert")
    String medical(@K(UserRequest.class) String request);
}
この時点で、これらの入力されたキーを使用して、AgenticScope の入力変数と出力変数を識別するエージェント システム全体を作成できます。
CategoryRouter routerAgent = AgenticServices.agentBuilder(CategoryRouter.class)
        .chatModel(baseModel())
        .build();

MedicalExpert medicalExpert = AgenticServices.agentBuilder(MedicalExpert.class)
        .chatModel(baseModel())
        .outputKey(ExpertResponse.class)
        .build();
LegalExpert legalExpert = AgenticServices.agentBuilder(LegalExpert.class)
        .chatModel(baseModel())
        .outputKey(ExpertResponse.class)
        .build();
TechnicalExpert technicalExpert = AgenticServices.agentBuilder(TechnicalExpert.class)
        .chatModel(baseModel())
        .outputKey(ExpertResponse.class)
        .build();

UntypedAgent expertsAgent = AgenticServices.conditionalBuilder()
        .subAgents(scope -> scope.readState(Category.class) == Category.MEDICAL, medicalExpert)
        .subAgents(scope -> scope.readState(Category.class) == Category.LEGAL, legalExpert)
        .subAgents(scope -> scope.readState(Category.class) == Category.TECHNICAL, technicalExpert)
        .build();

ExpertChatbot expertChatbot = AgenticServices.sequenceBuilder(ExpertChatbot.class)
        .subAgents(routerAgent, expertsAgent)
        .outputKey(ExpertResponse.class)
        .build();

String response = expertChatbot.ask("I broke my leg what should I do");
routerAgent は、出力キーが @Agent アノテーションの typedOutputKey 属性を通じてインターフェイスですでに定義されているため、プログラムで指定する必要がありません。一方、3 つのエキスパート エージェントは、インターフェイスで定義されていないため、出力キーをプログラムで指定する必要があるため、通常どおり、2 つのアプローチのいずれかを使用できます。また、条件付きワークフロー定義の場合と同様に、AgenticScope から値を読み取る場合、型指定されたキーが必要な型情報をすでに提供しているため、型チェックやキャストを実行する必要がないことにも注意してください。
純粋なエージェント AI
この時点まで、すべてのエージェントが接続され、結合されて、決定論的なワークフローを使用してエージェント システムが作成されてきました。ただし、エージェント システムがより柔軟で適応性があり、エージェントがコンテキストと以前の対話の結果に基づいて続行方法を決定できるようにする必要がある場合があります。これは、「純粋なエージェント AI」と呼ばれることがよくあります。
この目的のために、langchain4j-agentic モジュールは、すぐに使用できるスーパーバイザー エージェントを提供します。このスーパーバイザー エージェントは、一連のサブエージェントとともに提供され、次にどのエージェントを呼び出すか、または割り当てられたタスクが完了したかどうかを決定する計画を自律的に生成できます。
これがどのように機能するかの例を示すために、銀行口座にお金を入金したり引き出したり、ある通貨から特定の金額を別の通貨に交換したりできるいくつかのエージェントを定義してみましょう。
public interface WithdrawAgent {

    @SystemMessage("""
            You are a banker that can only withdraw US dollars (USD) from a user account,
            """)
    @UserMessage("""
            Withdraw {{amount}} USD from {{user}}'s account and return the new balance.
            """)
    @Agent("A banker that withdraw USD from an account")
    String withdraw(@V("user") String user, @V("amount") Double amount);
}

public interface CreditAgent {
    @SystemMessage("""
        You are a banker that can only credit US dollars (USD) to a user account,
        """)
    @UserMessage("""
        Credit {{amount}} USD to {{user}}'s account and return the new balance.
        """)
    @Agent("A banker that credit USD to an account")
    String credit(@V("user") String user, @V("amount") Double amount);
}

public interface ExchangeAgent {
    @UserMessage("""
            You are an operator exchanging money in different currencies.
            Use the tool to exchange {{amount}} {{originalCurrency}} into {{targetCurrency}}
            returning only the final amount provided by the tool as it is and nothing else.
            """)
    @Agent("A money exchanger that converts a given amount of money from the original to the target currency")
    Double exchange(@V("originalCurrency") String originalCurrency, @V("amount") Double amount, @V("targetCurrency") String targetCurrency);
}
これらすべてのエージェントは外部ツールを使用してタスクを実行します。具体的には、ユーザーのアカウントからお金を引き出したり入金したりするために使用できる BankTool です。
public class BankTool {

    private final Map<String, Double> accounts = new HashMap<>();

    void createAccount(String user, Double initialBalance) {
        if (accounts.containsKey(user)) {
            throw new RuntimeException("Account for user " + user + " already exists");
        }
        accounts.put(user, initialBalance);
    }

    double getBalance(String user) {
        Double balance = accounts.get(user);
        if (balance == null) {
            throw new RuntimeException("No balance found for user " + user);
        }
        return balance;
    }

    @Tool("Credit the given user with the given amount and return the new balance")
    Double credit(@P("user name") String user, @P("amount") Double amount) {
        Double balance = accounts.get(user);
        if (balance == null) {
            throw new RuntimeException("No balance found for user " + user);
        }
        Double newBalance = balance + amount;
        accounts.put(user, newBalance);
        return newBalance;
    }

    @Tool("Withdraw the given amount with the given user and return the new balance")
    Double withdraw(@P("user name") String user, @P("amount") Double amount) {
        Double balance = accounts.get(user);
        if (balance == null) {
            throw new RuntimeException("No balance found for user " + user);
        }
        Double newBalance = balance - amount;
        accounts.put(user, newBalance);
        return newBalance;
    }
}
ExchangeTool は、最新の為替レートを提供する REST サービスを使用して、ある通貨から別の通貨に両替するために使用できます。
public class ExchangeTool {

    @Tool("Exchange the given amount of money from the original to the target currency")
    Double exchange(@P("originalCurrency") String originalCurrency, @P("amount") Double amount, @P("targetCurrency") String targetCurrency) {
        // Invoke a REST service to get the exchange rate
    }
}
AgenticServices.agentBuilder() メソッドを使用して通常どおりこれらのエージェントのインスタンスを作成し、これらのツールを使用するように構成して、スーパーバイザー エージェントのサブエージェントとして使用できるようになりました。
BankTool bankTool = new BankTool();
bankTool.createAccount("Mario", 1000.0);
bankTool.createAccount("Georgios", 1000.0);

WithdrawAgent withdrawAgent = AgenticServices
        .agentBuilder(WithdrawAgent.class)
        .chatModel(BASE_MODEL)
        .tools(bankTool)
        .build();
CreditAgent creditAgent = AgenticServices
        .agentBuilder(CreditAgent.class)
        .chatModel(BASE_MODEL)
        .tools(bankTool)
        .build();

ExchangeAgent exchangeAgent = AgenticServices
        .agentBuilder(ExchangeAgent.class)
        .chatModel(BASE_MODEL)
        .tools(new ExchangeTool())
        .build();

SupervisorAgent bankSupervisor = AgenticServices
        .supervisorBuilder()
        .chatModel(PLANNER_MODEL)
        .subAgents(withdrawAgent, creditAgent, exchangeAgent)
        .responseStrategy(SupervisorResponseStrategy.SUMMARY)
        .build();
サブエージェントは、ワークフローを実装する複雑なエージェントである場合もあり、スーパーバイザーからは単一のエージェントとして認識されることに注意してください。
結果として得られる SupervisorAgent は通常、ユーザー要求を入力として受け取り、応答を生成するため、その署名は次のようになります。
public interface SupervisorAgent {
    @Agent
    String invoke(@V("request") String request);
}
ここで、次のリクエストを使用してこのエージェントを起動するとします。
bankSupervisor.invoke("Transfer 100 EUR from Mario's account to Georgios' one")
内部的には、スーパーバイザ エージェントがリクエストを分析し、一連の AgentInvocation によって作成されたタスクを達成するための計画を生成します。
public record AgentInvocation(String agentName, Map<String, String> arguments) {}
たとえば、前者のリクエストの場合、スーパーバイザは次のような一連の呼び出しを生成できます。
AgentInvocation{agentName='exchange', arguments={originalCurrency=EUR, amount=100, targetCurrency=USD}}

AgentInvocation{agentName='withdraw', arguments={user=Mario, amount=115.0}}

AgentInvocation{agentName='credit', arguments={user=Georgios, amount=115.0}}

AgentInvocation{agentName='done', arguments={response=The transfer of 100 EUR from Mario's account to Georgios' account has been completed. Mario's balance is 885.0 USD, and Georgios' balance is 1.18.1 USD. The conversion rate was 1.15 EUR to USD.}}
最後の呼び出しは、タスクが完了したとスーパーバイザーに知らせる特別な呼び出しで、実行されたすべての操作の概要を応答として返します。
今回のように、多くの場合、この概要がユーザーに返される最終応答になりますが、常にそうとは限りません。最初の例のように、単純なシーケンス ワークフローの代わりに SupervisorAgent を使用してストーリーを作成し、指定されたスタイルと対象者に従って編集するとします。この場合、ユーザーは最終的なストーリーのみに興味があり、それを作成するために実行された中間ステップの概要には興味がありません。
概要ではなく、最後に呼び出されたエージェントによって生成された応答を返すのが実際には最も一般的なシナリオであるため、これはスーパーバイザ エージェントのデフォルトの動作でもあります。ただし、この状況では、実行されたすべてのトランザクションの概要を返す方が適切であるため、SupervisorAgent は responseStrategy メソッドを通じてそれに応じて構成されています。
次のセクションでは、スーパーバイザ エージェントのこのカスタマイズとその他の可能なカスタマイズについて説明します。
スーパーバイザーの設計とカスタマイズ
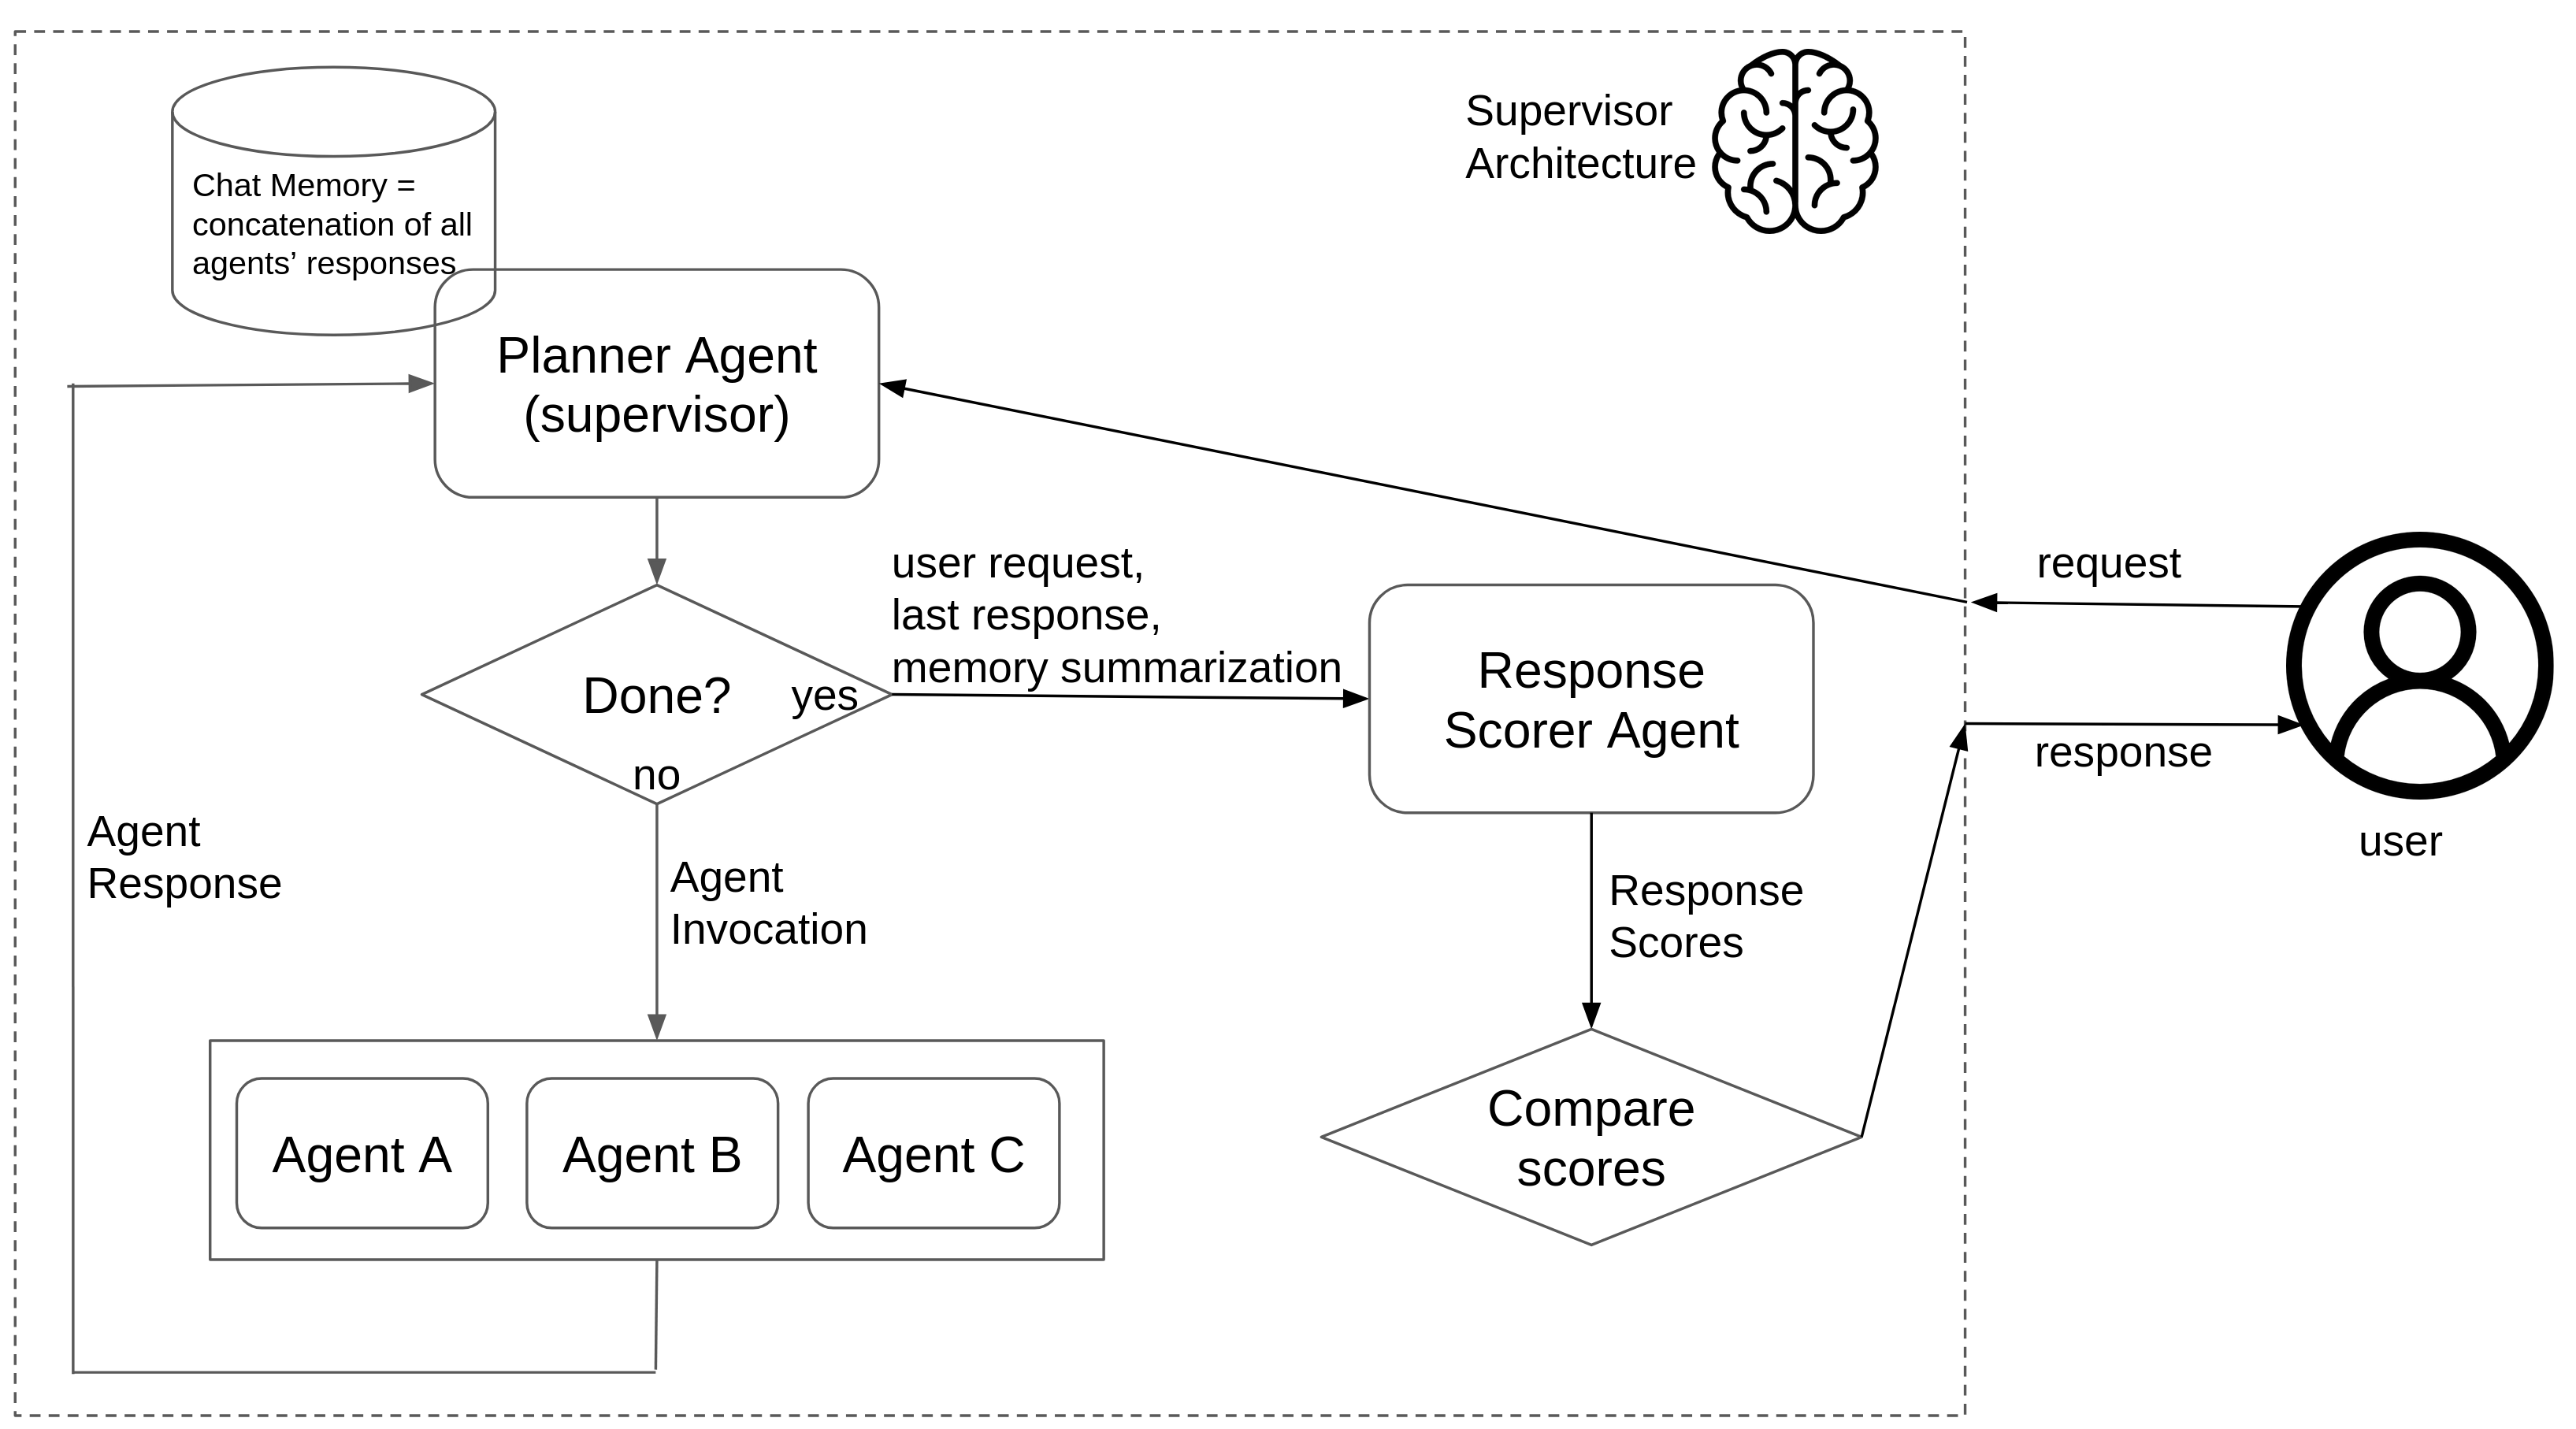
より一般的には、スーパーバイザーによって生成された要約と、最後に呼び出されたエージェントの最後の応答という 2 つの応答のうち、どちらが返されるのに最も適切であるかを事前に知ることができない場合があります。このような状況では、元のユーザー要求とともにこれら 2 つの可能な応答が渡され、どちらが要求によりよく適合するかを決定し、どちらを返すかを決定するためにそれらの応答をスコアリングする 2 番目のエージェントが利用できるようになりました。
SupervisorResponseStrategy 列挙型を使用すると、このスコアラー エージェントを有効にしたり、スコアリング プロセスをスキップして 2 つの応答のうちの 1 つを常に返すことができます。
public enum SupervisorResponseStrategy {
    SCORED, SUMMARY, LAST
}
予想どおり、デフォルトの動作は LAST であり、他の戦略実装は responseStrategy メソッドを使用してスーパーバイザ エージェント上で構成できます。
AgenticServices.supervisorBuilder()
        .responseStrategy(SupervisorResponseStrategy.SCORED)
        .build();
たとえば、銀行業務の例で SCORED 戦略を使用すると、次の応答スコアが生成される可能性があります。
ResponseScore{finalResponse=0.3, summary=1.0}
したがって、スーパーバイザ エージェントは、ユーザー要求に対する最終応答として概要を返すようになります。
これまで説明してきたスーパーバイザ エージェントのアーキテクチャを次の図に示します。
スーパーバイザーが次に取るべきアクションを決定するために使用する情報も、スーパーバイザーの重要な側面の 1 つです。デフォルトでは、スーパーバイザは単にローカル チャット メモリを使用しますが、場合によっては、コンテキスト エンジニアリングのセクションで説明したのと非常によく似た方法で、サブエージェントの会話を要約することによって生成された、より包括的なコンテキストをスーパーバイザに提供したり、両方のアプローチを同時に組み合わせたりすると便利な場合があります。 3 つの可能性は次の列挙型で表されます。
public enum SupervisorContextStrategy {
    CHAT_MEMORY, SUMMARIZATION, CHAT_MEMORY_AND_SUMMARIZATION
}
これは、contextGenerationStrategy メソッドを使用してスーパーバイザ エージェントを構築するときに設定できます。
AgenticServices.supervisorBuilder()
        .contextGenerationStrategy(SupervisorContextStrategy.SUMMARIZATION)
        .build();
スーパーバイザ エージェントのその他のカスタマイズ ポイントは、最終的には実装され、将来的に利用可能になる可能性があります。
スーパーバイザーにコンテキストを提供する
現実の多くのシナリオでは、監督者はオプションのコンテキスト、つまり計画の指針となる制約、ポリシー、または設定 (たとえば、「内部ツールを優先する」、「外部サービスを呼び出さない」、「通貨は米ドルでなければならない」など) から恩恵を受けます。
このコンテキストは、AgenticScope、supervisorContext という名前の変数に保存されます。次の 2 つの方法で提供できます。
- ビルド時の構成:
SupervisorAgent bankSupervisor = AgenticServices
        .supervisorBuilder()
        .chatModel(PLANNER_MODEL)
        .supervisorContext("Policies: prefer internal tools; currency USD; no external APIs")
        .subAgents(withdrawAgent, creditAgent, exchangeAgent)
        .responseStrategy(SupervisorResponseStrategy.SUMMARY)
        .build();
- 呼び出し (型指定されたスーパーバイザー):
@V("supervisorContext")の注釈が付けられたパラメーターを追加します。
public interface SupervisorAgent {
    @Agent
    String invoke(@V("request") String request, @V("supervisorContext") String supervisorContext);
}

// Example call (overrides the build-time value for this invocation)
bankSupervisor.invoke(
        "Transfer 100 EUR from Mario's account to Georgios' one",
        "Policies: convert to USD first; use bank tools only; no external APIs"
);
- 呼び出し (型なしスーパーバイザー): 入力マップに
supervisorContextを設定します。
Map<String, Object> input = Map.of(
        "request", "Transfer 100 EUR from Mario's account to Georgios' one",
        "supervisorContext", "Policies: convert to USD first; use bank tools only; no external APIs"
);

String result = (String) bankSupervisor.invoke(input);
両方が指定された場合、呼び出し値はビルド時の supervisorContext をオーバーライドします。
カスタムエージェントパターン
これまでに説明したエージェント パターンは、langchain4j-agentic モジュールによってすぐに使用できるように提供されていますが、それらのどれもアプリケーションの特定のニーズに適合しない場合はどうすればよいでしょうか?この場合、要件に合わせた方法で一連のサブエージェント間の対話を調整する独自のカスタム パターンを作成することができます。
さらに詳しく説明すると、エージェント パターンは、それが調整するサブエージェントの実行計画の仕様にすぎません。このプランは、次の Planner インターフェイスを実装することで定義できます。
public interface Planner {

    default void init(InitPlanningContext initPlanningContext) { }

    default Action firstAction(PlanningContext planningContext) {
        return nextAction(planningContext);
    }

    Action nextAction(PlanningContext planningContext);
}
このインターフェイスには、init、firstAction、nextAction の 3 つのメソッドがあります。 init メソッドは実行の開始時に 1 回呼び出され、プランナーが必要とするあらゆる状態またはデータ構造を初期化するために使用できます。 firstAction メソッドは、エージェント パターンによって実行される最初のアクションを決定するために呼び出されます。一方、nextAction メソッドは、各エージェントの実行後に呼び出され、AgenticScope の現在の状態と前回のエージェント実行の結果に基づいて実行される次のアクションを決定します。
firstAction メソッドが導入されたのは、多くの場合、Planner によって呼び出される最初のエージェントを定義する個別のコールバックがあると便利であるという理由だけであることに注意してください。ただし、この区別が必要ない状況では、呼び出しを nextAction メソッドに転送するだけのデフォルト実装が提供されるため、厳密にはオーバーライドする必要はありません。
firstAction メソッドと nextAction メソッドによって返される Action クラスは、エージェント パターンによって実行される次のステップを表し、次に呼び出される 1 つ以上のサブエージェントのリスト、または実行が完了したことを示す信号のいずれかになります。アクションでサブエージェント呼び出しが 1 つだけ指定されている場合は、プランナー自体を実行しているのと同じスレッドで順次実行されます。一方、複数ある場合は、提供された Executor または LangChain4j のデフォルトのものを使用して並行して実行されます。
すべての組み込みエージェント パターンも、この Planner 抽象化に関して記述されており、その実装を確認することで、これがどのように機能するかを明確にすることができ、独自のカスタム パターンを作成する良い出発点となります。たとえば、並列ワークフローはおそらくこれらの実装の中で最も単純であり、次のように定義されます。
public class ParallelPlanner implements Planner {

    private List<AgentInstance> agents;

    @Override
    public void init(InitPlanningContext initPlanningContext) {
        this.agents = initPlanningContext.subagents();
    }

    @Override
    public Action firstAction(PlanningContext planningContext) {
        return call(agents);
    }

    @Override
    public Action nextAction(PlanningContext planningContext) {
        return done();
    }
}
ここで、init メソッドは、並列ワークフローが構成されているサブエージェントのリストを保存するだけですが、firstAction メソッドは、これらすべてのエージェントを並列に呼び出すアクションを返します。この並列実行が完了すると、他に実行するアクションはないため、nextAction メソッドは実行の終了を通知するために使用される done() を返すだけです。
順次ワークフローを実装する Planner は、内部カーソルを使用して呼び出される次のサブエージェントを追跡し、その後 nextAction メソッドで適切なアクションを返すか、すべてのサブエージェントが呼び出されたら実行の終了を通知する必要があるため、少しだけ複雑になります。
public class SequentialPlanner implements Planner {

    private List<AgentInstance> agents;
    private int agentCursor = 0;

    @Override
    public void init(InitPlanningContext initPlanningContext) {
        this.agents = initPlanningContext.subagents();
    }

    @Override
    public Action nextAction(PlanningContext planningContext) {
        return agentCursor >= agents.size() ? done() : call(agents.get(agentCursor++));
    }
}
プランナーの実装からエージェント システムを定義する方法を理解するには、たとえば、次のように、トピックの小説を生成し、特定のスタイルと読者向けに編集する、前述の順次ワークフローのインスタンスを作成することができます。
UntypedAgent novelCreator = AgenticServices.plannerBuilder()
                .subAgents(creativeWriter, audienceEditor, styleEditor)
                .outputKey("story")
                .planner(SequentialPlanner::new)
                .build();
これは、シーケンシャル ワークフローに専用 API を使用するのとまったく同じです。
UntypedAgent novelCreator = AgenticServices.sequenceBuilder()
                .subAgents(creativeWriter, audienceEditor, styleEditor)
                .outputKey("story")
                .build();
plannerBuilder() メソッドは他のすべてのエージェント ビルダーと似ていますが、唯一の違いは、このエージェント システムで使用される特定のプランナーの新しいインスタンスを返す Supplier<Planner> を提供する必要があることです。もちろん、カスタム プランナーを実装するエージェント システムは、langchain4j-agentic モジュールによってすぐに提供される他のエージェント パターンとシームレスに組み合わせることができます。
この Planner 抽象化がどのように機能するかを明確にしたので、それを実装することで独自のカスタム エージェント パターンを作成できるようになりました。次のセクションでは、langchain4j-agentic-patterns モジュールで提供される、さまざまなシナリオで役立つカスタム パターンの 2 つの例について説明します。他のカスタム パターンも同じアプローチに従って作成でき、LangChain4j プロジェクトに戻すことができます。
目標指向のエージェントパターン
ワークフロー パターンとスーパーバイザー エージェントは、考えられるエージェント システムの範囲の 2 つの極端な例を表します。前者は完全に決定的で厳格であり、呼び出されるエージェントの順序を事前に決定する必要があります。一方、後者は完全に柔軟で適応性がありますが、呼び出されるエージェントの順序の決定は非決定的 LLM に委任されます。ただし、これら 2 つの極端な中間点の方が適切な場合があり、エージェントが比較的柔軟な方法で特定の目標に向かって作業できるようになりますが、これらのエージェントをどのように呼び出すかをアルゴリズム的に決定することもできます。
このアプローチを実践するには、エージェント システム全体で目標を定義する必要があるだけでなく、各サブエージェントが独自の事前条件と事後条件を宣言する必要もあります。これは、可能な限り最速の方法で目標を達成するためのエージェント呼び出しのシーケンスを計算するために必要です。ただし、これらの事前条件と事後条件は各エージェントの必要な入力と生成された出力に他ならず、最終目標は単にエージェント システム全体の望ましい出力であるため、これらの情報はすべて暗黙的にエージェント システムにすでに存在しています。
このアイデアに従って、エージェント システムに参加しているすべてのサブエージェントの依存関係グラフを計算し、AgenticScope の初期状態を分析して目的の目標と比較できる Planner を実装し、そのグラフを使用してその目標の達成につながるエージェント呼び出しのシーケンスを決定することができます。
public class GoalOrientedPlanner implements Planner {

    private String goal;

    private GoalOrientedSearchGraph graph;
    private List<AgentInstance> path;

    private int agentCursor = 0;

    @Override
    public void init(InitPlanningContext initPlanningContext) {
        this.goal = initPlanningContext.plannerAgent().outputKey();
        this.graph = new GoalOrientedSearchGraph(initPlanningContext.subagents());
    }

    @Override
    public Action firstAction(PlanningContext planningContext) {
        path = graph.search(planningContext.agenticScope().state().keySet(), goal);
        if (path.isEmpty()) {
            throw new IllegalStateException("No path found for goal: " + goal);
        }
        return call(path.get(agentCursor++));
    }

    @Override
    public Action nextAction(PlanningContext planningContext) {
        return agentCursor >= path.size() ? done() : call(path.get(agentCursor++));
    }
}
予想どおり、ここでは目標はプランナー ベースのエージェント パターン自体の最終出力と一致しますが、初期状態から目標までのパスは、すべてのサブエージェントの入力キーと出力キーを分析して構築された GoalOrientedSearchGraph を使用して計算されます。次に、呼び出されるエージェントのシーケンスが、現在の状態から目的の目標までのグラフ上の最短パスとして計算されます。
これがどのように機能するかの実際的な例を示すために、プロンプトから人の名前と星座を抽出し、その星座の星占いを生成し、インターネット上で関連するストーリーを探し、最終的にこれらすべての情報を組み合わせた優れた記事を作成できる、目標指向のエージェント システムを構築してみましょう。この一連のタスクは、次の 5 つのエージェントを使用して達成できます。
public interface HoroscopeGenerator {
    @SystemMessage("You are an astrologist that generates horoscopes based on the user's name and zodiac sign.")
    @UserMessage("Generate the horoscope for {{person}} who is a {{sign}}.")
    @Agent("An astrologist that generates horoscopes based on the user's name and zodiac sign.")
    String horoscope(@V("person") Person person, @V("sign") Sign sign);
}

public interface PersonExtractor {

    @UserMessage("Extract a person from the following prompt: {{prompt}}")
    @Agent("Extract a person from user's prompt")
    Person extractPerson(@V("prompt") String prompt);
}

public interface SignExtractor {

    @UserMessage("Extract the zodiac sign of a person from the following prompt: {{prompt}}")
    @Agent("Extract a person from user's prompt")
    Sign extractSign(@V("prompt") String prompt);
}

public interface Writer {
    @UserMessage("""
            Create an amusing writeup for {{person}} based on the following:
            - their horoscope: {{horoscope}}
            - a current news story: {{story}}
            """)
    @Agent("Create an amusing writeup for the target person based on their horoscope and current news stories")
    String write(@V("person") Person person, @V("horoscope") String horoscope, @V("story") String story);
}

public interface StoryFinder {

    @SystemMessage("""
            You're a story finder, use the provided web search tools, calling it once and only once,
            to find a fictional and funny story on the internet about the user provided topic.
            """)
    @UserMessage("""
            Find a story on the internet for {{person}} who has the following horoscope: {{horoscope}}.
            """)
    @Agent("Find a story on the internet for a given person with a given horoscope")
    String findStory(@V("person") Person person, @V("horoscope") String horoscope);
}
以前に開発した GoalOrientedPlanner を利用して、これらのエージェントを次のように目的指向のエージェント システムに組み合わせることができます。
HoroscopeGenerator horoscopeGenerator = AgenticServices.agentBuilder(HoroscopeGenerator.class)
        .chatModel(baseModel())
        .outputKey("horoscope")
        .build();

PersonExtractor personExtractor = AgenticServices.agentBuilder(PersonExtractor.class)
        .chatModel(baseModel())
        .outputKey("person")
        .build();

SignExtractor signExtractor = AgenticServices.agentBuilder(SignExtractor.class)
        .chatModel(baseModel())
        .outputKey("sign")
        .build();

Writer writer = AgenticServices.agentBuilder(Writer.class)
        .chatModel(baseModel())
        .outputKey("writeup")
        .build();

StoryFinder storyFinder = AgenticServices.agentBuilder(StoryFinder.class)
        .chatModel(baseModel())
        .tools(new WebSearchTool())
        .outputKey("story")
        .build();

UntypedAgent horoscopeAgent = AgenticServices.plannerBuilder()
        .subAgents(horoscopeGenerator, personExtractor, signExtractor, writer, storyFinder)
        .outputKey("writeup")
        .planner(GoalOrientedPlanner::new)
        .build();
予想どおり、このエージェント システムの全体的な目標は、GOAP ベースのプランナー自体の出力キーでもある writeup を生成することです。すべてのサブエージェントの入力と出力を考慮すると、GoalOrientedSearchGraph によって構築される依存関係グラフは次のようになります。
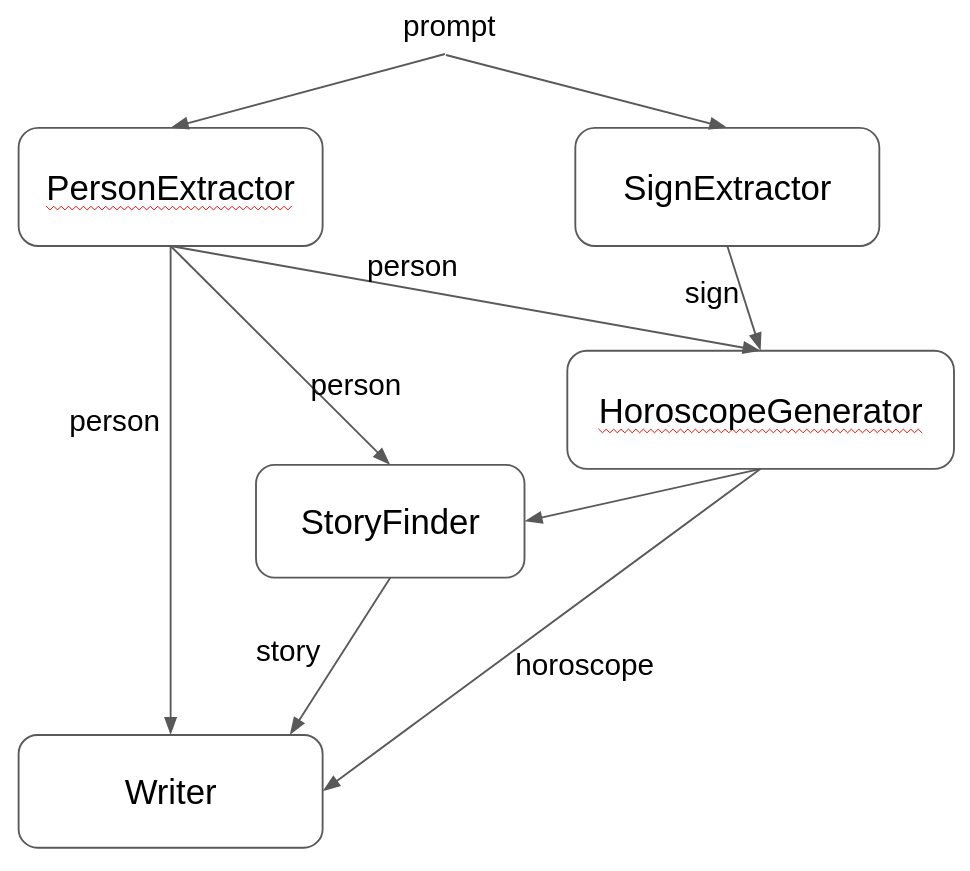
「私の名前はマリオ、星座はうお座です」のようなプロンプトでこのエージェント システムを呼び出すとき
Map<String, Object> input = Map.of("prompt", "My name is Mario and my zodiac sign is pisces");
String writeup = horoscopeAgent.invoke(input);
GoalOrientedPlanner は、prompt 変数のみを含む AgenticScope の初期状態を分析し、その初期状態から目的の目標 (writeup) までの依存関係グラフ上の最短パスを計算します。その結果、エージェント呼び出しのシーケンスは次のようになります。
Agents path sequence: [extractPerson, extractSign, horoscope, findStory, write]
予想どおり、この目標指向のエージェント パターンは、他の既存のエージェント パターンと混合したり組み合わせることができることに注意してください。たとえば、この可能性は、可能な限り最短のパスをたどって特定の目標に到達するように最適化されているため、構造的にループが許可されていないという、このアプローチの明らかな制限を克服するために使用できます。そのため、場合によっては、この目標指向のパターンのサブエージェントとしてループ エージェント パターンを持つことが役立つ可能性があります。
ピアツーピアエージェントパターン
これまで説明したすべてのエージェント システムは、集中型の階層アーキテクチャに基づいています。実際、すべてのワークフロー パターンには、プログラムで事前に決定された方法で複数のサブエージェントのアクティビティを調整する、明確に定義されたトップレベル エージェントがありました。 LLM ベースのプランナー エージェントの存在により、より柔軟かつ動的になっているスーパーバイザー パターンでも、依然としてさまざまなサブエージェント間の対話を制御するコーディネーター エージェントに依存しています。このアーキテクチャの類型は多くのアプリケーションやシナリオに適していますが、特にスケーラビリティとフォールト トレランスの点でいくつかの制限がある場合もあります。これが、より分散化された分散戦略を採用することでこれらの制限を克服できる、マルチエージェント システム用の代替ピアツーピア アプローチを提供したい理由です。
ピアツーピア エージェント システムでは、トップレベルのエージェントは存在せず、すべてのエージェントは AgenticScope の状態を通じて調整される同等のピアです。特に、エージェントは、AgenticScope 内の状態変数として独自の必要な入力が存在することによってトリガーされます。その後、別のエージェントの出力によって生成されたこれらの変数の 1 つ以上が変更されると、そのエージェントの呼び出しが再度トリガーされる可能性があります。 AgenticScope が安定状態に達してエージェントを呼び出すことができなくなった場合、事前定義された終了条件が満たされた場合、またはエージェント呼び出しの最大数に達した場合、プロセスは終了します。このピアツーピア エージェント パターンを実現する Planner 実装は、次のように記述できます。
public class P2PPlanner implements Planner {

    private final int maxAgentsInvocations;
    private final BiPredicate<AgenticScope, Integer> exitCondition;

    private int invocationCounter = 0;
    private Map<String, AgentActivator> agentActivators;

    public P2PPlanner(int maxAgentsInvocations, BiPredicate<AgenticScope, Integer> exitCondition) {
        this(null, maxAgentsInvocations, exitCondition);
    }

    @Override
    public void init(InitPlanningContext initPlanningContext) {
        this.agentActivators = initPlanningContext.subagents().stream().collect(toMap(AgentInstance::agentId, AgentActivator::new));
    }

    @Override
    public Action nextAction(PlanningContext planningContext) {
        if (terminated(planningContext.agenticScope())) {
            return done();
        }

        AgentActivator lastExecutedAgent = agentActivators.get(planningContext.previousAgentInvocation().agentId());
        lastExecutedAgent.finishExecution();
        agentActivators.values().forEach(a -> a.onStateChanged(lastExecutedAgent.agent.outputKey()));

        return nextCallAction(planningContext.agenticScope());
    }

    private Action nextCallAction(AgenticScope agenticScope) {
        AgentInstance[] agentsToCall = agentActivators.values().stream()
                .filter(agentActivator -> agentActivator.canActivate(agenticScope))
                .peek(AgentActivator::startExecution)
                .map(AgentActivator::agent)
                .toArray(AgentInstance[]::new);
        invocationCounter += agentsToCall.length;
        return call(agentsToCall);
    }

    private boolean terminated(AgenticScope agenticScope) {
        return invocationCounter > maxAgentsInvocations || exitCondition.test(agenticScope, invocationCounter);
    }
}
ここで、P2PPlanner は、これまでに実行されたエージェント呼び出しの数を追跡し、各サブエージェントの AgentActivator を使用して、AgenticScope の現在の状態に基づいてサブエージェントを呼び出すことができるかどうかを判断します。 nextAction メソッドは、終了条件が満たされているかどうか、または呼び出しの最大数に達しているかどうかをチェックし、満たされていない場合は、現在の状態に基づいてアクティブ化できるすべてのエージェントを識別し、開始済みとしてマークし、それらを呼び出すアクションを返します。
これがどのように機能するかの実際的な例を示すために、科学的調査を実行し、特定のトピックについて新しい仮説を立てることができるピアツーピア エージェント システムを構築してみましょう。このサービスの API は次のようになります。
public interface ResearchAgent {

    @Agent("Conduct research on a given topic")
    String research(@V("topic") String topic);
}
この目的のために、次の 5 つのエージェントを定義できます。
public interface LiteratureAgent {

    @SystemMessage("Search for scientific literature on the given topic and return a summary of the findings.")
    @UserMessage("""
            You are a scientific literature search agent.
            Your task is to find relevant scientific papers on the topic provided by the user and summarize them.
            Use the provided tool to search for scientific papers and return a summary of your findings.
            The topic is: {{topic}}
            """)
    @Agent("Search for scientific literature on a given topic")
    String searchLiterature(@V("topic") String topic);
}

public interface HypothesisAgent {

    @SystemMessage("Based on the research findings, formulate a clear and concise hypothesis related to the given topic.")
    @UserMessage("""
            You are a hypothesis formulation agent.
            Your task is to formulate a clear and concise hypothesis based on the research findings provided by the user.
            The topic is: {{topic}}
            The research findings are: {{researchFindings}}
            """)
    @Agent("Formulate hypothesis around a give topic based on research findings")
    String makeHypothesis(@V("topic") String topic, @V("researchFindings") String researchFindings);
}

public interface CriticAgent {

    @SystemMessage("Critically evaluate the given hypothesis related to the specified topic. Provide constructive feedback and suggest improvements if necessary.")
    @UserMessage("""
            You are a critical evaluation agent.
            Your task is to critically evaluate the hypothesis provided by the user in relation to the specified topic.
            Provide constructive feedback and suggest improvements if necessary.
            If you need to, you can also perform additional research to validate or confute the hypothesis using the provided tool.
            The topic is: {{topic}}
            The hypothesis is: {{hypothesis}}
            """)
    @Agent("Critically evaluate a hypothesis related to a given topic")
    String criticHypothesis(@V("topic") String topic, @V("hypothesis") String hypothesis);
}

public interface ValidationAgent {

    @SystemMessage("Validate the provided hypothesis on the given topic based on the critique provided.")
    @UserMessage("""
            You are a validation agent.
            Your task is to validate the hypothesis provided by the user in relation to the specified topic based on the critique provided.
            Validate the provided hypothesis, either confirming it or reformulating a different hypothesis based on the critique.
            The topic is: {{topic}}
            The hypothesis is: {{hypothesis}}
            The critique is: {{critique}}
            """)
    @Agent("Validate a hypothesis based on a given topic and critique")
    String validateHypothesis(@V("topic") String topic, @V("hypothesis") String hypothesis, @V("critique") String critique);
}

public interface ScorerAgent {

    @SystemMessage("Score the provided hypothesis on the given topic based on the critique provided.")
    @UserMessage("""
            You are a scoring agent.
            Your task is to score the hypothesis provided by the user in relation to the specified topic based on the critique provided.
            Score the provided hypothesis on a scale from 0.0 to 1.0, where 0.0 means the hypothesis is completely invalid and 1.0 means the hypothesis is fully valid.
            The topic is: {{topic}}
            The hypothesis is: {{hypothesis}}
            The critique is: {{critique}}
            """)
    @Agent("Score a hypothesis based on a given topic and critique")
    double scoreHypothesis(@V("topic") String topic, @V("hypothesis") String hypothesis, @V("critique") String critique);
}
これらのエージェントにはすべて、arXiv から学術論文をダウンロードするなど、科学文献の調査を実行できるツールが提供され、P2P エージェント システムに追加されます。
ArxivCrawler arxivCrawler = new ArxivCrawler();

LiteratureAgent literatureAgent = AgenticServices.agentBuilder(LiteratureAgent.class)
        .chatModel(baseModel())
        .tools(arxivCrawler)
        .outputKey("researchFindings")
        .build();
HypothesisAgent hypothesisAgent = AgenticServices.agentBuilder(HypothesisAgent.class)
        .chatModel(baseModel())
        .tools(arxivCrawler)
        .outputKey("hypothesis")
        .build();
CriticAgent criticAgent = AgenticServices.agentBuilder(CriticAgent.class)
        .chatModel(baseModel())
        .tools(arxivCrawler)
        .outputKey("critique")
        .build();
ValidationAgent validationAgent = AgenticServices.agentBuilder(ValidationAgent.class)
        .chatModel(baseModel())
        .tools(arxivCrawler)
        .outputKey("hypothesis")
        .build();
ScorerAgent scorerAgent = AgenticServices.agentBuilder(ScorerAgent.class)
        .chatModel(baseModel())
        .tools(arxivCrawler)
        .outputKey("score")
        .build();

ResearchAgent researcher = AgenticServices.plannerBuilder(ResearchAgent.class)
        .subAgents(literatureAgent, hypothesisAgent, criticAgent, validationAgent, scorerAgent)
        .outputKey("hypothesis")
        .planner(() -> new P2PPlanner(10, agenticScope -> {
            if (!agenticScope.hasState("score")) {
                return false;
            }
            double score = agenticScope.readState("score", 0.0);
            System.out.println("Current hypothesis score: " + score);
            return score >= 0.85;
        }))
        .build();

String hypothesis = researcher.research("black holes");
この構成では、researcher p2p コーディネーターに研究のトピックが渡されます。この時点で、呼び出すことができる唯一のエージェントは literatureAgent です。これは、必要な入力をすべて備えている唯一のエージェントであるためです。この場合、AgenticScope に存在する topic です。このエージェントの呼び出しにより researchFindings 変数が生成され、これが AgenticScope 状態に追加され、この新しい変数が HypothesisAgent の呼び出しをトリガーします。次に、これにより hypothesis が生成され、次に criticAgent がトリガーされます。最後に、ValidationAgent は、hypothesis と critique の両方の入力を受け取り、最終的に他のエージェントを再度トリガーする新しい hypothesis を生成します。その間、ScorerAgent は score を hypothesis に渡し、この score が 0.85 以上になるか、最大 10 個のエージェント呼び出しが実行されると、プロセスは終了します。次の図は、この実行に関係するすべてのエージェントと変数をまとめたものです。
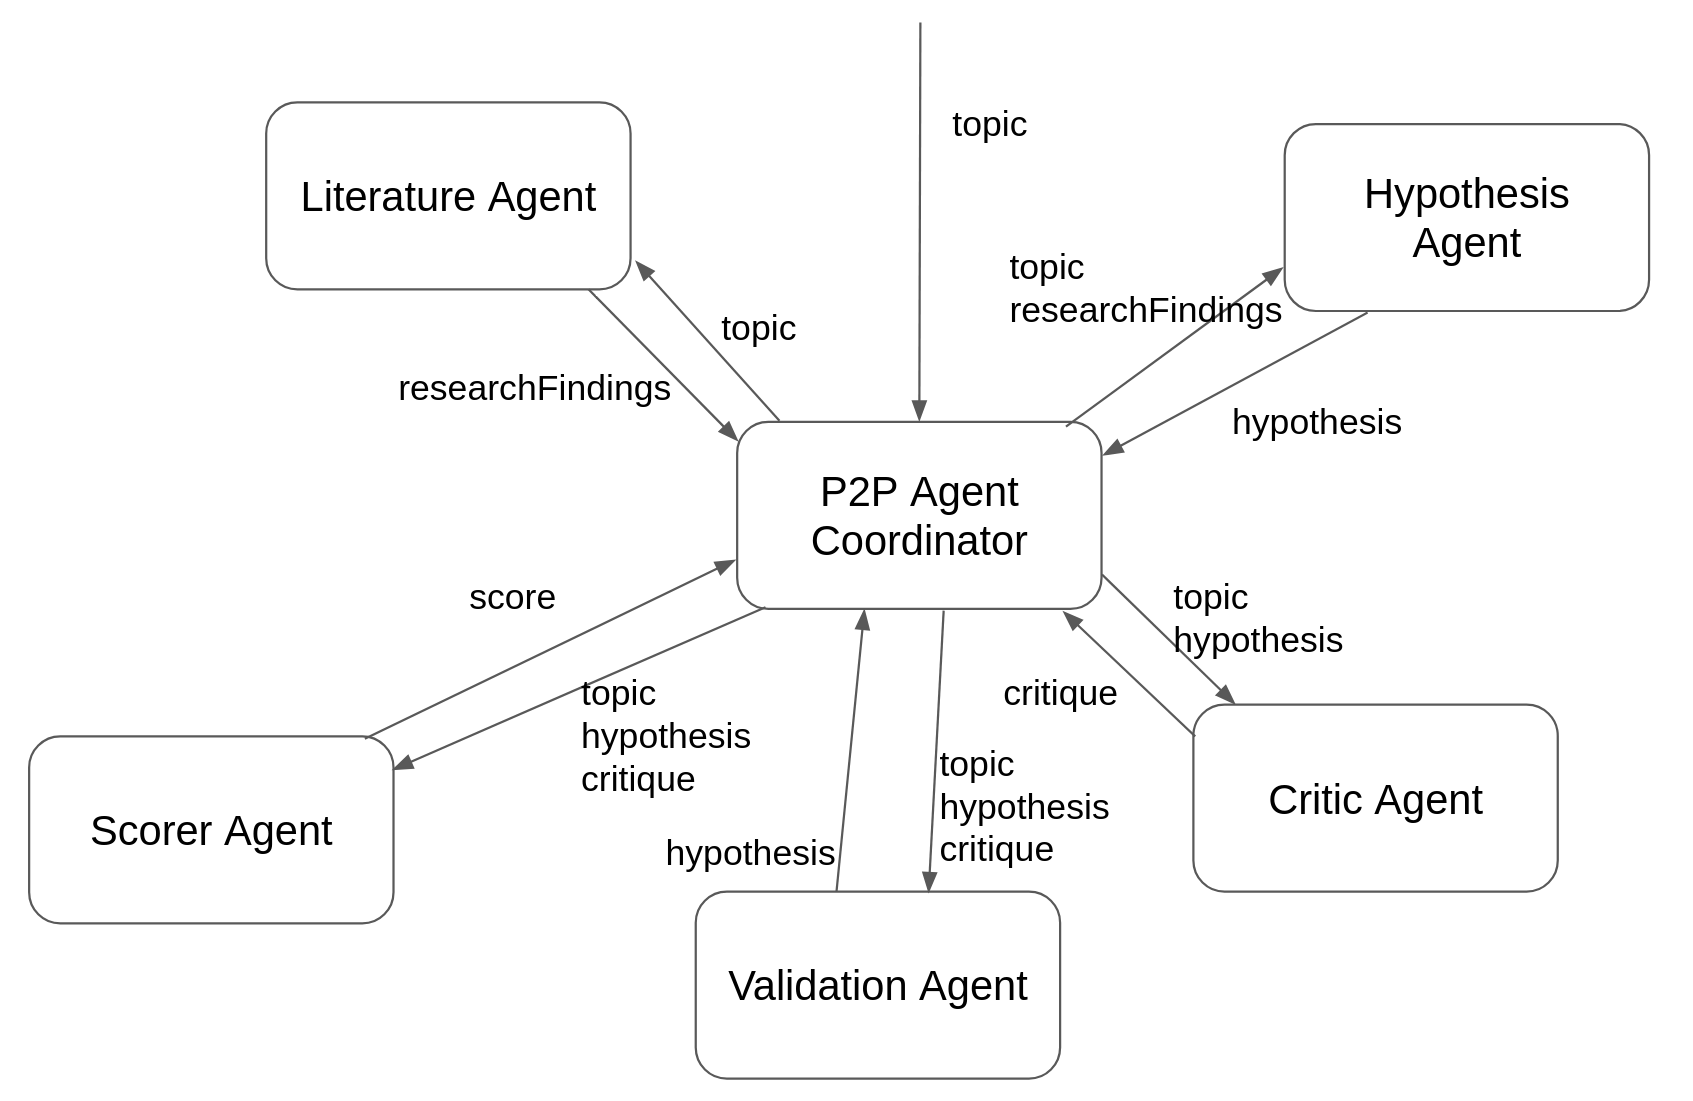
たとえば、この例の通常の実行は、ScorerAgent が所定のしきい値を超えるスコアを生成したために終了する可能性があります。
Current hypothesis score: 0.95
最終的な出力は次のようになります。
Based on the provided references, here are some key points about stochastic gravitational wave backgrounds (SGWBs) from primordial black holes (PBHs):

1. **Detection Rates and Sources:**
   - The detection rate of gravity waves emitted during parabolic encounters of stellar black holes in globular clusters was estimated by Kocsis et al. [85].
   - Gravitational wave bursts from PBH hyperbolic encounters were discussed by García-Bellido and Nesseris [93].

2. **Energy Emission:**
   - The energy spectrum of gravitational waves from hyperbolic encounters was studied by De Vittori, Jetzer, and Klein [88].
   - Gravitational wave energy emission and detection rates for PBH hyperbolic encounters were analyzed by García-Bellido and Nesseris [90].

3. **Template Banks:**
   - Template banks for gravitational waveforms from coalescing binary black holes (including non-spinning binaries) were developed by Ajith et al. [92].

4. **Constraints on PBHs:**
   - Constraints on primordial black holes were reviewed by Carr, Kohri, Sendouda, and Yokoyama [98].
   - Universal gravitational wave signatures of cosmological solitons were discussed by Lozanov, Sasaki, and Takhistov [100].

5. **Induced SGWBs:**
   - Doubly peaked induced stochastic gravitational wave backgrounds were tested for baryogenesis from primordial black holes by Bhaumik et al. [101].
   - Distinct signatures of spinning PBH domination and evaporation, including doubly peaked gravitational waves, dark relics, and CMB complementarity, were explored by Bhaumik et al. [101].

6. **Future Detectors:**
   - Future detectors like Taiji, LISA, DECIGO, Big Bang Observer, Cosmic Explorer, Einstein Telescope, and KAGRA are expected to contribute significantly to the detection of SGWBs from PBHs.

7. **Pulsar Timing Arrays:**
   - Pulsar timing arrays have been used to search for an isotropic stochastic gravitational wave background [73-75].

8. **Template Banks and Simulations:**
   - Template banks like those developed by Ajith et al. are crucial for matching observed signals with theoretical predictions.
黒板エージェントパターン
P2P パターンは、準備ができているすべてのエージェントを並行してアクティブ化し、それらを同等のピアとして扱います。ただし、複数のエージェントが関与する可能性がある場合に競合解決を適用して、集中スケジューラが次に起動する単一エージェントを決定する必要があるシナリオもあります。これは黒板パターンです。エージェントは部分的な結果を AgenticScope (黒板) に投稿する知識源であり、集中プランナーは各ステップの後に黒板を検査して、最も適切なエージェントをアクティブにします。
P2P と同様に、エージェントは、すべての引数がスコープ内に存在する場合に暗黙的にアクティブ化されます。主な違いは、ステップごとに 1 つのエージェントのみが起動し、複数のエージェントの準備ができている場合、ConflictResolutionStrategy によってどのエージェントが優先されるかが決定されることです。戦略が指定されていない場合は、subAgents メソッドの宣言順序がデフォルトのタイブレーカーとして使用されます。
BlackboardPlanner は、目標述語が満たされるか、エージェントが起動できない (静止) 場合に正常に終了します。目標が満たされる前に呼び出しの最大数に達すると、IllegalStateException がスローされます。デフォルトでは、目標述語はプランナーの outputKey がスコープ内に存在するかどうかをチェックします。これは最も一般的な終了条件です。
public class BlackboardPlanner implements Planner {

    private final Predicate<AgenticScope> goalPredicate;
    private final ConflictResolutionStrategy conflictResolutionStrategy;
    private final int maxInvocations;

    @Override
    public Action nextAction(PlanningContext planningContext) {
        // After each agent completes:
        // 1. Check goal predicate → done() if satisfied
        // 2. Find all agents whose inputs are available
        // 3. Pick the best one via conflict resolution (or declaration order)
        // 4. Return call(selectedAgent) — always exactly one agent per step
    }
}
ConflictResolutionStrategy は、現在のスコープと起動の準備ができているすべての候補エージェントを受け取り、アクティブ化する必要があるエージェントを返す機能インターフェイスです。
@FunctionalInterface
public interface ConflictResolutionStrategy {

    AgentInstance resolve(AgenticScope scope, List<AgentInstance> candidates);
}
このインターフェイスには、複数の戦略をチェーンするための or コンビネータとともに、いくつかの便利なファクトリ メソッドが付属しています。たとえば、declarationOrder() は、subAgents メソッドで使用される順序を維持して最初の候補を単純に選択しますが、agentOfType は、指定されたタイプに一致する候補を選択します (オプションで AgenticScope の条件によって保護され、条件が満たされない場合、またはそのタイプの候補が存在しない場合は null を返します)。 or コンビネータは 2 つの戦略を連鎖させます。最初の戦略が null を返した場合、2 番目の戦略が試行されます。これらを組み合わせると、「条件が成立する場合はタイプ X のエージェントを優先し、そうでない場合は宣言順序にフォールバックする」という agentOfType(X.class, condition).or(declarationOrder()) のようなパイプラインを構築できます。
実際の例として、専門エージェントが所見を黒板に投稿し、十分な証拠が蓄積された場合にのみ診断が行われる医療診断システムを考えてみましょう。エージェントが起動する順序はあらかじめ決まっていませんが、利用可能なデータによって異なります。
SymptomExtractor symptomExtractor = AgenticServices.agentBuilder(SymptomExtractor.class)
        .chatModel(baseModel()).build();

LabResultAnalyzer labAnalyzer = AgenticServices.agentBuilder(LabResultAnalyzer.class)
        .chatModel(baseModel()).build();

DrugInteractionChecker drugInteraction = AgenticServices.agentBuilder(DrugInteractionChecker.class)
        .chatModel(baseModel()).build();

DiagnosisAgent diagnosis = AgenticServices.agentBuilder(DiagnosisAgent.class)
        .chatModel(baseModel()).build();

MedicalDiagnostics diagnostics = AgenticServices.plannerBuilder(MedicalDiagnostics.class)
        .subAgents(symptomExtractor, labAnalyzer, drugInteraction, diagnosis)
        .planner(BlackboardPlanner::new)
        .outputKey("diagnosis")
        .build();

String result = diagnostics.diagnose(patientInput, labResults, medications);
SymptomExtractor は、最初から唯一の入力 (patientInput) が利用可能であるため、最初に起動されます。症状が抽出されると、LabResultAnalyzer と DrugInteractionChecker の両方が対象となる可能性がありますが、ステップごとに起動されるのは 1 つだけです。最後に、symptoms と labAnalysis の両方が黒板上にある場合、DiagnosisAgent が起動されます。デフォルトの目標述語が "diagnosis" (プランナーの outputKey) がスコープ内に存在することを検出したため、システムは終了します。終了条件がより複雑な場合は、カスタムの目標述語を BlackboardPlanner コンストラクターに提供できます。
臨床状況がエージェントのオーダーに重要な場合、ConflictResolutionStrategy はスコープの状態を検査して、情報に基づいた決定を下すことができます。たとえば、患者の症状が薬剤や副作用について述べている場合、臨床検査よりも薬物相互作用分析を優先する必要があります。
MedicalDiagnostics diagnostics = AgenticServices.plannerBuilder(MedicalDiagnostics.class)
        .subAgents(symptomExtractor, labAnalyzer, drugInteraction, diagnosis)
        .planner(() -> new BlackboardPlanner(
                agentOfType(DrugInteractionChecker.class, scope -> {
                            String symptoms = scope.readState("symptoms", "");
                            return symptoms.toLowerCase().contains("medication")
                                    || symptoms.toLowerCase().contains("drug");
                        })
                        .or(declarationOrder())))
        .outputKey("diagnosis")
        .build();
この例をさらに充実させるために、HumanInTheLoop エージェントが黒板の知識源として直接参加することもできます。 inputKey メソッドは人間のレビュー担当者が依存するスコープ キーを宣言するため、ブラックボードはそのデータが利用可能な場合にのみメソッドをアクティブにします。その outputKey は "symptoms" に設定されます。レビュー担当者が診断を拒否すると、戻り値によって症状が追加情報で上書きされ、当然のことながら症状に依存するすべてのエージェントが再トリガーされます。
HumanInTheLoop humanReview = AgenticServices.humanInTheLoopBuilder()
        .description("Review the diagnosis and decide whether to approve or request additional analysis")
        .outputKey("symptoms")
        .inputKey(String.class, "diagnosis")
        .responseProvider(scope -> {
            String diagnosis = scope.readState("diagnosis", "");
            String symptoms = scope.readState("symptoms", "");
            if (!isAcceptable(diagnosis)) {
                return symptoms + ". Patient also reports blurred vision.";
            }
            scope.writeState("approvedDiagnosis", diagnosis);
            return symptoms;
        })
        .build();

MedicalDiagnostics diagnostics = AgenticServices.plannerBuilder(MedicalDiagnostics.class)
        .subAgents(symptomExtractor, labAnalyzer, drugInteraction, diagnosisAgent, humanReview)
        .planner(() -> new BlackboardPlanner(
                scope -> scope.hasState("approvedDiagnosis"),
                agentOfType(DrugInteractionChecker.class, scope -> {
                            String symptoms = scope.readState("symptoms", "");
                            return symptoms.toLowerCase().contains("medication")
                                    || symptoms.toLowerCase().contains("drug");
                        })
                        .or(declarationOrder())))
        .outputKey("approvedDiagnosis")
        .build();
inputKey(String.class, "diagnosis") は、レビューアがスコープ内に "diagnosis" が存在した後にのみアクティブ化する必要があることをブラックボードに指示します。レビュー担当者が拒否すると、戻り値 (強化された症状) が HITL の outputKey 経由で "symptoms" キーに書き込まれます。その後、黒板の通常の onStateChanged("symptoms") メカニズムが症状に応じたエージェント (DrugInteractionChecker や DiagnosisAgent など) を再活性化し、次のレビュー用に修正された診断を生成します。この 2 番目の実装では、BlackboardPlanner を通じて実装された MedicalDiagnostics の OutputKey が、"diagnosis" から "approvedDiagnosis" に変更され、HumanInTheLoop がエージェント システムの実行に参加できるようになっていることに注意してください。このようにして、レビュー担当者が承認すると、"approvedDiagnosis" が AgenticScope に書き込まれ、目標述語が満たされます。
投票エージェントのパターン
ここまで説明したエージェント パターンはすべて、作業を分割したり、タスクを順序付けたり、決定をルーティングしたりするなど、さまざまな作業を行うエージェントを調整します。ただし、複数のエージェントが同じ問題に個別に取り組み、その回答を集約してより堅牢な結果を生成したい場合があります。これは投票 (または評議会) パターンです。同じ入力に対してすべてのサブエージェントを並行して実行し、その出力を投票として収集し、プラグイン可能な集約戦略を通じてそれらを調整します。
このパターンは、分類、コンテンツのモデレーション、リスク評価、および単一のエージェントの判断よりも多様なアプローチにわたる合意の方が信頼できるあらゆる意思決定に特に役立ちます。異なるプロンプト、モデル、または視点を持つエージェントに同じ入力を分析させることで、単一のエージェントの偏見やエラーが最終結果に伝播する可能性を減らします。
VotingPlanner は、すべてのサブエージェントを並行してディスパッチし、すべてのサブエージェントが完了するまで待機し、VotingStrategy を使用して出力を集約します。
public class VotingPlanner implements Planner {

    private final VotingStrategy strategy;

    private List<AgentInstance> subagents;
    private int completedCount;
    private final List<Object> votes = new ArrayList<>();

    public VotingPlanner() {
        this(VotingStrategy.majority());
    }

    public VotingPlanner(VotingStrategy strategy) {
        this.strategy = strategy;
    }

    @Override
    public void init(InitPlanningContext initPlanningContext) {
        this.subagents = initPlanningContext.subagents();
    }

    @Override
    public Action firstAction(PlanningContext planningContext) {
        if (subagents.isEmpty()) {
            return done();
        }
        return call(subagents);
    }

    @Override
    public Action nextAction(PlanningContext planningContext) {
        votes.add(planningContext.previousAgentInvocation().output());
        completedCount++;

        if (completedCount < subagents.size()) {
            return noOp();
        }

        return done(strategy.aggregate(votes));
    }

    @Override
    public AgenticSystemTopology topology() {
        return AgenticSystemTopology.STAR;
    }
}
firstAction メソッドは、すべてのサブエージェントを一度にディスパッチします。トポロジは STAR であるため、フレームワークはそれらを並列実行し、エージェントの完了ごとに nextAction を 1 回呼び出します。各呼び出しでは、完了したエージェントの出力が投票として収集されます。すべてのエージェントが投票すると、プランナーは VotingStrategy を通じて結果を集計し、完了を通知します。
VotingStrategy は、1 つのメソッドと 3 つの組み込み静的ファクトリ メソッドを備えた機能インターフェイスです。
@FunctionalInterface
public interface VotingStrategy {

    Object aggregate(Collection<Object> votes);

    static VotingStrategy majority() { ... }  // most common value wins
    static VotingStrategy average() { ... }   // mean of numeric values
    static VotingStrategy highest() { ... }   // max by natural ordering
}
majority()は、平等性によって投票をグループ化し、最も一般的な値を返します。エージェントがカテゴリラベルを返す分類タスクに最適です。average()は、数値投票の算術平均を計算します。これは、エージェントが信頼値または評価を返すタスクのスコアリングに役立ちます。highest()は、自然な順序で最大値を選択します。これは、最も楽観的または最も信頼性の高い評価が必要な場合に適しています。
ユーザーは、ラムダ式を介してカスタム戦略を提供することもできます。たとえば、加重投票、信頼度ベースのフィルタリング、またはクォーラム ルールを実装できます。
これがどのように機能するかの実際的な例を示すために、異なるプロンプトを持つ 3 つの独立したエージェントを使用して顧客のフィードバックを分類する、投票ベースのセンチメント分類器を構築してみましょう。各エージェントは、ポジティブ、ネガティブ、またはニュートラルの 1 つの単語を返すように指示されます。
public interface SentimentClassifier1 {

    @UserMessage("""
            Classify the sentiment of the following text.
            Reply with exactly one word: POSITIVE, NEGATIVE, or NEUTRAL.
            The text is: "{{text}}"
            """)
    @Agent("Classify the sentiment of a given text")
    String classify(@V("text") String text);
}

public interface SentimentClassifier2 {

    @UserMessage("""
            You are a sentiment analysis expert.
            Analyze the emotional tone of the following text and classify it.
            Reply with exactly one word: POSITIVE, NEGATIVE, or NEUTRAL.
            The text is: "{{text}}"
            """)
    @Agent("Analyze the emotional tone of a given text")
    String classify(@V("text") String text);
}

public interface SentimentClassifier3 {

    @UserMessage("""
            You are a customer feedback analyst.
            Determine whether the following feedback is positive, negative, or neutral.
            Reply with exactly one word: POSITIVE, NEGATIVE, or NEUTRAL.
            The text is: "{{text}}"
            """)
    @Agent("Determine the sentiment of customer feedback")
    String classify(@V("text") String text);
}
各分類子は、わずかに異なる角度から同じタスクにアプローチします。1 つは一般的な分類子、1 つは専門アナリスト、もう 1 つは顧客のフィードバックに特化しています。これら 3 つのエージェントを組み合わせて、投票ベースのエージェント システムを構築できます。
SentimentClassifier1 c1 = AgenticServices.agentBuilder(SentimentClassifier1.class)
        .chatModel(baseModel())
        .outputKey("vote1")
        .build();

SentimentClassifier2 c2 = AgenticServices.agentBuilder(SentimentClassifier2.class)
        .chatModel(baseModel())
        .outputKey("vote2")
        .build();

SentimentClassifier3 c3 = AgenticServices.agentBuilder(SentimentClassifier3.class)
        .chatModel(baseModel())
        .outputKey("vote3")
        .build();

SentimentVoter voter = AgenticServices.plannerBuilder(SentimentVoter.class)
        .subAgents(c1, c2, c3)
        .outputKey("classification")
        .planner(VotingPlanner::new)
        .build();

ResultWithAgenticScope<String> result = voter.classify(
        "I absolutely love this product! It exceeded all my expectations.");
この構成では、3 つの分類子が同じテキストに対して並行して呼び出されます。それぞれがその分類を独自の出力キー (vote1、vote2、vote3) に書き込み、VotingPlanner は 3 つの結果すべてを収集します。デフォルトのコンストラクターは VotingStrategy.majority() を使用するため、最も一般的な分類が優先されます。上記の明らかに肯定的なテキストの場合、3 人のエージェント全員が POSITIVE を返し、全会一致の結果が得られる可能性があります。しかし、1 人のエージェントが同意しないというあいまいなケースでも、多数決により確実な最終分類が保証されます。
別の集計戦略を使用するには、それを VotingPlanner コンストラクターに渡すだけです。
.planner(() -> new VotingPlanner(VotingStrategy.average()))
または、完全にカスタムの戦略を提供します。
.planner(() -> new VotingPlanner(votes ->
        votes.stream()
                .map(Object::toString)
                .map(String::toUpperCase)
                .collect(Collectors.groupingBy(Function.identity(), Collectors.counting()))
                .entrySet().stream()
                .max(Map.Entry.comparingByValue())
                .map(Map.Entry::getKey)
                .orElse(null)))
このカスタム戦略は、集計前にすべての投票を大文字に正規化し、エージェント間の小さな書式の違い(例: Positive と POSITIVE)を処理します。
ディベートエージェントパターン
これまで説明したパターンは、エージェントを 1 回派遣する (投票)、データの可用性に基づいてエージェントをアクティブ化する (ブラックボード、P2P)、または目標に向かってエージェントを順序付けする (GOAP) かのいずれかです。それらのどれも、敵対的な洗練、つまりエージェントが互いの推論を確認し、自分の立場を繰り返し修正するプロセスをサポートしていません。ディベート パターンはこのギャップを埋めます。エージェントは独立した回答を並行して生成し、その後、批評ラウンドに参加し、ディベート履歴全体を読んで議論を洗練させることができます。ラウンドは、エージェントが同じ答えに集まるか、ラウンドの最大数に達するまで続き、その時点でジャッジエージェントが最終的な評決を下します。
このパターンは、事実確認、リスク評価、コード レビュー、およびエージェントが競合する議論にさらされることで出力の品質が向上するあらゆる分野で特に役立ちます。エージェントに互いの推論に対峙して応答するよう強制することで、ディベート パターンは、単独のエージェントでは見逃す可能性のある問題を捉え、敵対的な精査を通じて誤検知を除外します。
このパターンは、サブエージェントを 討論者 (最後を除くすべて) と 裁判官 (最後に登録されたサブエージェント) に分割する DebatePlanner を通じて実装されます。プランナーは、maxRounds (デフォルト 3) と ConvergenceStrategy (デフォルト unanimous()) の 2 つのパラメーターで構成されます。
初期化中に、プランナは少なくとも 3 人のサブエージェント (討論者 2 名と裁判官 1 名) が登録されていることを検証し、それに応じてリストを分割します。最初のアクションは、AgenticScope に空の debateContext キーをシードします。これが必要なのは、討論者エージェントが @V(DEBATE_CONTEXT_KEY) 経由でこのキーを参照するためです。これがないと、最初のラウンドは MissingArgumentException で失敗します。次に、すべての討論者を並行して派遣します。
各ディベーターが完了すると、nextAction が呼び出されます (フレームワークのロックの下でシリアル化されます)。プランナーは、各出力をエージェント名をキーとしたマップに記録し、すべての討論者が終了するまで noOp() を返します。すべての応答が収集されると、ConvergenceStrategy が収束を報告するかどうか、および現在のラウンドが maxRounds に到達したかどうかという 2 つの条件がチェックされます。どちらの場合も、プランナーはジャッジフェーズに入ります。プランナーはディベートコンテキストを AgentName: "response" エントリ (1 行に 1 つ) としてフォーマットし、それをスコープに書き込み、ジャッジエージェントを派遣します。ジャッジが完了すると、プランナーはジャッジの出力を最終結果として含む done() を返します。収束にもラウンド制限にも達しない場合、プランナーは現在のディベート コンテキストをスコープに書き込み、ラウンド カウンターを増分し、すべてのディベーターを別の批評ラウンドに再派遣し、そこでお互いの以前の議論を確認して応答することができます。
ConvergenceStrategy は、単一メソッド hasConverged(Collection<Object> positions) を備えた機能インターフェイスです。 2 つの組み込み戦略が提供されています。unanimous() は、すべての位置にわたって正確な同等性をチェックし (承認/拒否などのラベルベースの決定に適しています)、unanimousLastWord() は、各位置から最後の単語を抽出して大文字に正規化し、すべてのエージェントが同じ判定で終了したかどうかをチェックします。意味的な類似性やしきい値ベースの一致など、より微妙な収束ロジックの場合、ユーザーはカスタム戦略をラムダとして提供できます。
このパターンの実際の動作を確認するために、3 人の倫理討論者が異なる哲学的観点から議論し、裁判官が彼らの議論を総合して最終的な評決を下す討論パネルを構築してみましょう。
public interface UtilitarianDebater {

    @UserMessage("""
            You are a utilitarian ethics debater. \
            Consider the following question and argue from a utilitarian perspective, maximizing overall well-being.
            If previous debate context is provided, consider the other debaters' arguments and refine your position.
            Keep your response to 2-3 sentences. End with a one-word verdict: AGREE or DISAGREE.
            Question: {{question}}
            Previous debate context: {{debateContext}}
            """)
    @Agent(value = "Argues from a utilitarian ethics perspective", name = "Utilitarian")
    String debate(@V("question") String question, @V(DEBATE_CONTEXT_KEY) String debateContext);
}

public interface DeontologicalDebater {

    @UserMessage("""
            You are a deontological ethics debater. \
            Consider the following question and argue based on moral rules, duties, and rights.
            If previous debate context is provided, consider the other debaters' arguments and refine your position.
            Keep your response to 2-3 sentences. End with a one-word verdict: AGREE or DISAGREE.
            Question: {{question}}
            Previous debate context: {{debateContext}}
            """)
    @Agent(value = "Argues from a deontological ethics perspective", name = "Deontologist")
    String debate(@V("question") String question, @V(DEBATE_CONTEXT_KEY) String debateContext);
}

public interface PragmatistDebater {

    @UserMessage("""
            You are a pragmatist debater. \
            Consider the following question and argue based on practical consequences and real-world outcomes.
            If previous debate context is provided, consider the other debaters' arguments and refine your position.
            Keep your response to 2-3 sentences. End with a one-word verdict: AGREE or DISAGREE.
            Question: {{question}}
            Previous debate context: {{debateContext}}
            """)
    @Agent(value = "Argues from a pragmatist perspective", name = "Pragmatist")
    String debate(@V("question") String question, @V(DEBATE_CONTEXT_KEY) String debateContext);
}

public interface EthicsJudge {

    @UserMessage("""
            You are an impartial ethics judge. \
            Review the debate context where multiple debaters have argued about a question from different perspectives.
            Synthesize their arguments and provide a balanced, well-reasoned final verdict in 3-4 sentences.
            Debate context: {{debateContext}}
            """)
    @Agent(value = "Renders a final verdict by synthesizing debate arguments", name = "Judge")
    String judge(@V("debateContext") String debateContext);
}
各ディベーターは、question (元の入力、一定のまま) と debateContext (ディベート履歴を使用してラウンドごとにプランナーによって更新される) の両方を受け取ります。 @V(DEBATE_CONTEXT_KEY) は、DebatePlanner からの公開定数を参照し、各 @Agent の明示的な name は、ディベート コンテキストでエージェントがどのようにラベル付けされるかを制御します。元の質問は討論のやりとりに埋め込まれているため、裁判官は debateContext のみを受け取ります。お互いに上書きしないように、各ディベーターは個別の outputKey を持っている必要があることに注意してください。
最上位のプランナーのインターフェイスと配線は次のようになります。
public interface EthicsPanel {

    @Agent
    String debate(@V("question") String question);
}

UtilitarianDebater d1 = AgenticServices.agentBuilder(UtilitarianDebater.class)
        .chatModel(baseModel())
        .outputKey("utilitarian")
        .build();

DeontologicalDebater d2 = AgenticServices.agentBuilder(DeontologicalDebater.class)
        .chatModel(baseModel())
        .outputKey("deontological")
        .build();

PragmatistDebater d3 = AgenticServices.agentBuilder(PragmatistDebater.class)
        .chatModel(baseModel())
        .outputKey("pragmatist")
        .build();

EthicsJudge judge = AgenticServices.agentBuilder(EthicsJudge.class)
        .chatModel(baseModel())
        .outputKey("verdict")
        .build();

EthicsPanel panel = AgenticServices.plannerBuilder(EthicsPanel.class)
        .subAgents(d1, d2, d3, judge)
        .outputKey("verdict")
        .planner(() -> new DebatePlanner(3))
        .build();

String result = panel.debate(
        "Is it ethical to use AI-generated art in commercial products without crediting the AI tool?");
討論者が最初にリストされ、裁判官は常に最後の副代理人になります。ラウンド 1 では、3 人の討論者全員が独立した立場を表明します。ラウンド 2 では、各ディベーターが他の議論を見て、自分の立場を洗練したり、反論したり、拡張したりすることができます。討論者が集まるかラウンドの最大数に達するかにかかわらず、裁判官は常に完全な討論の文脈に基づいて最終的な評決を下します。
収束チェックまたはラウンド数をカスタマイズするには:
.planner(() -> new DebatePlanner(5)) // allow up to 5 rounds
.planner(() -> new DebatePlanner(positions ->
        positions.stream().allMatch(p -> p.toString().contains("AGREE"))))  // custom convergence
信念-欲望-意図 (BDI) エージェント パターン
Belief-Desire-Intention (BDI) パターンは、明示的な目標を維持し、現在達成可能な目標を評価し、環境が変化したときにそれらの目標を反応的に切り替えるエージェントの古典的な AI 概念をモデル化します。このパターンを実装するプランナーは、信念 (AgenticScope からの現在の世界状態)、欲望 (優先順位付けされた一連の目標)、および意図 (現在実行されているコミットされた計画) の 3 つの構造を維持します。各ステップでプランナーは、より優先度の高い願望が達成可能になったかどうかを確認し、達成可能であれば現在の意図を取り下げて再検討します。このため、BDI は、複数の競合する目標のバランスをとる必要があり、優先順位がいつでも変更される可能性がある動的な環境に自然に適しています。
Desire は、名前、優先度レベル、達成可能述語、満足述語、およびその欲求を追求する意図を形成するエージェント タイプの順序付きリストを組み合わせたレコードとして定義されます。
public record Desire(String name, int priority,
                     Predicate<AgenticScope> achievable,
                     Predicate<AgenticScope> satisfied,
                     List<Class<?>> agentTypes) {

    public static Desire of(String name, int priority,
                            Predicate<AgenticScope> achievable,
                            Predicate<AgenticScope> satisfied,
                            Class<?>... agentTypes) {
        return new Desire(name, priority, achievable, satisfied, List.of(agentTypes));
    }

    public static Desire of(String name, int priority,
                            String achievableStateKey,
                            String satisfiedStateKey,
                            Class<?>... agentTypes) {
        return new Desire(name, priority,
                scope -> scope.hasState(achievableStateKey),
                scope -> scope.hasState(satisfiedStateKey),
                List.of(agentTypes));
    }
}
このパターンを実装する BDIPlanner は、Desire インスタンスのリストを取得し、審議サイクルを実装します。初期化中に、登録された各サブエージェントをタイプごとにマップし、デザイアがクラスごとにエージェントを参照できるようにします。実行が開始されると、プランナーはすべての欲求をフィルタリングして、現在達成可能でまだ満たされていない欲求を見つけ、最も高い優先順位を持つものを選択し (同じ優先順位の中で、リストで最初に宣言されたものが優先されます)、その欲求によって定義されるエージェントの順序付けされたシーケンスとして定義されるその意図にコミットします。後続の各ステップで、プランナーは 3 つのチェックを実行します。まず、満足。現在の欲求が満たされているかどうかをテストし、プランナーは次の欲求を選択するために再検討します。 2 番目、プリエンプション。信念の変更 (AgenticScope に書き込まれる新しい値) により、厳密に優先順位の高い願望が達成可能になったかどうかを検証し、現在の意図は一時停止され、優先順位の高いものが引き継ぎます。 3 番目に、実行可能性 で現在の欲求がまだ達成可能か、満たされていないかを確認し、プランナーは意図シーケンスの次のエージェントに進みます。プリエンプトされたディザイアが後で再選択されると、再起動するのではなく中断したところから再開されるため、すでに完了したエージェントが再度呼び出されることはありません。
すべての欲求が満たされるか、何も達成できない場合、実行は正常に終了します。プランナーは、2 つの不正な動作のシナリオで IllegalStateException をスローします。 1 つは、ディザイアのインテント全体が完了したが、ディザイアが満たされないままの場合 (満たされた述語が期待するキーをエージェントが書き込まない場合)、または、満たされていないディザイアがまだ保留中の状態で、構成可能な最大呼び出し回数に達した場合です。
クラッシュからの回復時に、プランナーは最初から再検討します。満たされた欲求はスキップされますが、選択された欲求の意図は最初のエージェントから再開されます。クラッシュ前にすでに完了していたエージェントは再度実行されるため、インテンション エージェントは冪等である必要があります。
このパターンを説明するために、5 つの AI エージェントと 1 つの非 AI エージェントを備えた自律取引システムを考えてみましょう。 MarketRecommendationAgent は MarketRecommendation 列挙型を返し、ヘッジは推奨事項が SELL または STRONG_SELL の場合にのみトリガーされます。 HedgingStrategyDefaulter は、hedgingStrategy が常にスコープ内に存在することを保証する非 AI エージェント (ヘッジがスキップされた場合のデフォルトは "None") であるため、RebalancingAgent は常にそれを入力として受け取ることができます。
public enum MarketRecommendation {
    STRONG_BUY, BUY, HOLD, SELL, STRONG_SELL
}

public interface MarketAnalysisAgent {
    @UserMessage("Analyze the market data and portfolio. Market: {{marketData}} Portfolio: {{portfolio}}")
    @Agent(value = "Analyze market conditions", outputKey = "marketAnalysis")
    String analyzeMarket(@V("marketData") String marketData, @V("portfolio") String portfolio);
}

public interface MarketRecommendationAgent {
    @UserMessage("Based on the market analysis, provide a trading recommendation. Market analysis: {{marketAnalysis}}")
    @Agent(value = "Provide a trading recommendation", outputKey = "recommendation")
    MarketRecommendation recommend(@V("marketAnalysis") String marketAnalysis);
}

public static class HedgingStrategyDefaulter {
    @Agent(outputKey = "hedgingStrategy")
    public String defaultHedging(AgenticScope scope) {
        return scope.hasState("hedgingStrategy") ? (String) scope.readState("hedgingStrategy") : "None";
    }
}

public interface RebalancingAgent {
    @UserMessage("Suggest rebalancing based on: {{marketAnalysis}} Hedging strategy: {{hedgingStrategy}} Portfolio: {{portfolio}}")
    @Agent(value = "Rebalance portfolio", outputKey = "rebalancingPlan")
    String rebalance(@V("marketAnalysis") String marketAnalysis,
                     @V("hedgingStrategy") String hedgingStrategy,
                     @V("portfolio") String portfolio);
}

public interface HedgingAgent {
    @UserMessage("Recommend hedging strategies based on: {{marketAnalysis}}")
    @Agent(value = "Hedge against risks", outputKey = "hedgingStrategy")
    String hedge(@V("marketAnalysis") String marketAnalysis);
}

public interface LiquidityAgent {
    @UserMessage("Assess liquidity for portfolio: {{portfolio}}")
    @Agent(value = "Maintain liquidity", outputKey = "liquidityAssessment")
    String assessLiquidity(@V("portfolio") String portfolio);
}
これらのエージェントは、優先順位の異なる 4 つの欲求を備えた BDI ベースの取引システムに接続されています。 「リスクヘッジ」デザイアでは、推奨値を検査する述語ベースの達成可能性チェックが使用されており、「ポートフォリオのリバランス」デザイアでは、hedgingStrategy スコープ値が存在することを保証するために、RebalancingAgent の前に HedgingStrategyDefaulter が含まれていることに注意してください。
TradingSystem tradingSystem = AgenticServices.plannerBuilder(TradingSystem.class)
        .subAgents(marketAnalysis, recommendation, new HedgingStrategyDefaulter(),
                   rebalancing, hedging, liquidity)
        .planner(() -> new BDIPlanner(List.of(
                Desire.of("analyze market", 1,
                        "marketData", "recommendation",
                        MarketAnalysisAgent.class, MarketRecommendationAgent.class),
                Desire.of("hedge risks", 2,
                        scope -> scope.hasState("recommendation")
                                && Set.of(MarketRecommendation.SELL, MarketRecommendation.STRONG_SELL)
                                    .contains(scope.readState("recommendation")),
                        scope -> scope.hasState("hedgingStrategy"),
                        HedgingAgent.class),
                Desire.of("rebalance portfolio", 1,
                        "recommendation", "rebalancingPlan",
                        HedgingStrategyDefaulter.class, RebalancingAgent.class),
                Desire.of("maintain liquidity", 1,
                        "portfolio", "liquidityAssessment",
                        LiquidityAgent.class)
        )))
        .build();
市場データとポートフォリオ状態を使用して呼び出される場合、プランナーの検討サイクルは次のように機能します。「市場の分析」と「流動性の維持」の要望は最初に達成可能です。 MarketAnalysisAgent と MarketRecommendationAgent が完了すると、推奨事項によって次のステップが決定されます。推奨事項が SELL または STRONG_SELL の場合、「リスクヘッジ」の要望 (優先度 2) が達成可能になり、優先度の低い作業が優先され、プランナーは HedgingAgent を呼び出します。ヘッジ完了後、プランナーは再検討します。「リバランス ポートフォリオ」デザイアは HedgingStrategyDefaulter (既存のヘッジ戦略を保存) を実行し、続いて RebalancingAgent を実行し、入力としてヘッジ戦略を受け取ります。推奨が SELL または STRONG_SELL ではない場合、ヘッジは完全にスキップされ、HedgingStrategyDefaulter は "None" を書き込むため、RebalancingAgent は引き続き続行できます。この反応的な条件主導型の切り替えが BDI の本質です。システムは、厳格な計画に従うのではなく、変化する信念に基づいて動作を適応させます。
非AIエージェント
これまで説明したすべてのエージェントは AI エージェントです。つまり、LLM に基づいており、自然言語の理解と生成を必要とするタスクを実行するために呼び出すことができます。ただし、langchain4j-agentic モジュールは非 AI エージェントもサポートしており、REST API の呼び出しやコマンドの実行など、自然言語処理を必要としないタスクの実行に使用できます。これらの非 AI エージェントは確かにツールに似ていますが、この文脈では、AI エージェントと同じように使用したり、AI エージェントと混合してより強力で完全なエージェント システムを構成したりできるように、エージェントとしてモデル化するのが便利です。
たとえば、スーパーバイザーの例で使用されている ExchangeAgent は、おそらく AI エージェントとして不適切にモデル化されており、単に REST API を呼び出して為替を実行する非 AI エージェントとして定義する方が適切かもしれません。
public class ExchangeOperator {

    @Agent(value = "A money exchanger that converts a given amount of money from the original to the target currency",
            outputKey = "exchange")
    public Double exchange(@V("originalCurrency") String originalCurrency, @V("amount") Double amount, @V("targetCurrency") String targetCurrency) {
        // invoke the REST API to perform the currency exchange
    }
}
これにより、スーパーバイザが利用できる他のサブエージェントと同じように使用できるようになります。
WithdrawAgent withdrawAgent = AgenticServices
        .agentBuilder(WithdrawAgent.class)
        .chatModel(BASE_MODEL)
        .tools(bankTool)
        .build();
CreditAgent creditAgent = AgenticServices
        .agentBuilder(CreditAgent.class)
        .chatModel(BASE_MODEL)
        .tools(bankTool)
        .build();

SupervisorAgent bankSupervisor = AgenticServices
        .supervisorBuilder()
        .chatModel(PLANNER_MODEL)
        .subAgents(withdrawAgent, creditAgent, new ExchangeOperator())
        .build();
基本的に、langchain4j-agentic のエージェントは、@Agent アノテーションが付けられたメソッドを 1 つだけ持つ任意の Java クラスにすることができます。
最後に、非 AI エージェントも、AgenticScope の状態を読んだり、小さな操作を実行したりするのに役立ちます。このため、AgenticServices は、Consumer<AgenticServices> から単純なエージェントを作成するための agentAction ファクトリ メソッドを提供します。たとえば、score を String 値として生成する scorer エージェントと、その score を double として消費する必要がある後続の reviewer エージェントがあるとします。この場合、2 つのエージェントには互換性がありませんが、agentAction を使用して、AgenticScope の score 状態を次のように書き換えることで、最初のエージェントの出力を 2 番目のエージェントが必要とする形式に適合させることができます。
UntypedAgent editor = AgenticServices.sequenceBuilder()
        .subAgents(
                scorer,
                AgenticServices.agentAction(agenticScope -> agenticScope.writeState("score", Double.parseDouble(agenticScope.readState("score", "0.0")))),
                reviewer)
        .build();
ヒューマン・イン・ザ・ループ
エージェント システムを構築する際のもう 1 つの一般的なニーズは、人間が関与することで、システムが特定のアクションを続行する前に不足している情報の入力や承認をユーザーに求めることができるようにすることです。この人間参加型機能は、特別な非 AI エージェントと見なすこともできるため、そのように実装されます。
public record HumanInTheLoop(Function<AgenticScope, ?> responseProvider) {

    @Agent("An agent that asks the user for missing information")
    public Object askUser(AgenticScope scope) {
        return responseProvider.apply(scope);
    }
}
この非常に単純ですが、非常に汎用的な実装は、現在の AgenticScope を入力として受け取る単一関数の使用に基づいており、そこから適切な質問をするためのコンテキストを抽出し、ユーザーに提供されるべき応答を返すことができます。
langchain4j-agentic モジュールによってすぐに提供される HumanInTheLoop エージェントを使用すると、この関数をエージェントの説明、およびユーザーの応答が書き込まれる出力変数とともに定義できます。
たとえば、次のように AstrologyAgent を定義するとします。
public interface AstrologyAgent {
    @SystemMessage("""
        You are an astrologist that generates horoscopes based on the user's name and zodiac sign.
        """)
    @UserMessage("""
        Generate the horoscope for {{name}} who is a {{sign}}.
        """)
    @Agent("An astrologist that generates horoscopes based on the user's name and zodiac sign.")
    String horoscope(@V("name") String name, @V("sign") String sign);
}
次のように、この AI エージェントと HumanInTheLoop エージェントの両方を使用して、ホロスコープを生成する前にユーザーに星座を尋ね、その質問をコンソールの標準出力に送信し、標準入力からユーザーの応答を読み取るシーケンス ワークフローを作成することができます。
HumanInTheLoop humanInTheLoop = AgenticServices.humanInTheLoopBuilder()
        .description("An agent that asks the zodiac sign of the user")
        .outputKey("sign")
        .responseProvider(scope -> {
            System.out.println("Hi " + scope.readState("name") + ", what is your sign?");
            System.out.print("> ");
            try {
                BufferedReader reader = new BufferedReader(new InputStreamReader(System.in));
                return reader.readLine();
            } catch (IOException e) {
                throw new RuntimeException("Failed to read input", e);
            }
        })
        .build();

AstrologyAgent astrologyAgent = AgenticServices.agentBuilder(AstrologyAgent.class)
        .chatModel(baseModel())
        .outputKey("horoscope")
        .build();

UntypedAgent horoscopeAgent = AgenticServices.sequenceBuilder()
        .subAgents(humanInTheLoop, astrologyAgent)
        .outputKey("horoscope")
        .build();
このようにして、ユーザーが次のようなリクエストで horoscopeAgent を呼び出した場合、
horoscopeAgent.invoke(Map.of("name", "Mario"));
このシーケンスは、まず HumanInTheLoop エージェントを呼び出してユーザーに不足している星座を尋ね、次の出力を生成します。
Hi Mario, what is your sign?
>
ユーザーが回答を提供するのを待ちます。回答は AstrologyAgent を呼び出してホロスコープを生成するために使用されます。
ユーザーが回答を提供するまでに時間がかかる場合があるため、HumanInTheLoop エージェントを非同期エージェントとして構成することが可能であり、実際に推奨されています。このようにして、ユーザーの入力を必要としないエージェントは、エージェント システムがユーザーの回答を待っている間に実行を続行できます。
メモリとコンテキストエンジニアリング
これまで説明したすべてのエージェントはステートレスです。これは、エージェントが以前の対話のコンテキストや記憶を保持しないことを意味します。ただし、他の AI サービスと同様に、エージェントに ChatMemory を提供して、エージェントが複数の呼び出しにわたってコンテキストを維持できるようにすることができます。
以前の MedicalExpert にメモリを提供するには、@MemoryId の注釈が付けられたフィールドをその署名に追加するだけで十分です。
public interface MedicalExpertWithMemory {

    @UserMessage("""
        You are a medical expert.
        Analyze the following user request under a medical point of view and provide the best possible answer.
        The user request is {{request}}.
        """)
    @Agent("A medical expert")
    String medical(@MemoryId String memoryId, @V("request") String request);
}
そして、エージェントを構築するときにメモリプロバイダーを設定します。
MedicalExpertWithMemory medicalExpert = AgenticServices
        .agentBuilder(MedicalExpertWithMemory.class)
        .chatModel(BASE_MODEL)
        .chatMemoryProvider(memoryId -> MessageWindowChatMemory.withMaxMessages(10))
        .outputKey("response")
        .build();
一般に、単一のエージェントを単独で使用する場合はこれで十分ですが、エージェント システムに参加するエージェントの場合は制限となる可能性があります。技術専門家と法律専門家にもメモリが提供され、ExpertRouterAgent もそれを持つように再定義されていると仮定します。
public interface ExpertRouterAgentWithMemory {

    @Agent
    String ask(@MemoryId String memoryId, @V("request") String request);
}
このエージェントに対するこれら 2 つの呼び出しのシーケンス
String response1 = expertRouterAgent.ask("1", "I broke my leg, what should I do?");

String legalResponse1 = expertRouterAgent.ask("1", "Should I sue my neighbor who caused this damage?");
2 番目の質問は法律専門家に送られるため、期待どおりの結果は得られません。法律専門家は初めて呼び出され、前の質問の記憶がありません。
この問題を解決するには、法律の専門家にコンテキストとその発動前に何が起こったのかを提供する必要があります。これは、AgenticScope に自動的に保存される情報が役立つもう 1 つのユースケースです。
特に、AgenticScope はすべてのエージェントの呼び出しのシーケンスを追跡し、それらの呼び出しを 1 つの会話に連結したコンテキストを生成できます。このコンテキストはそのまま使用することも、必要に応じて、たとえば ContextSummarizer エージェントを定義するなど、短いバージョンに要約して使用することもできます。
public interface ContextSummarizer {

    @UserMessage("""
        Create a very short summary, 2 sentences at most, of the
        following conversation between an AI agent and a user.

        The user conversation is: '{{it}}'.
        """)
    String summarize(String conversation);
}
このエージェントを使用すると、法律専門家を再定義して、以前の会話のコンテキストの要約を提供できるため、新しい質問に答えるときに以前のやり取りを考慮に入れることができます。
LegalExpertWithMemory legalExpert = AgenticServices
        .agentBuilder(LegalExpertWithMemory.class)
        .chatModel(BASE_MODEL)
        .chatMemoryProvider(memoryId -> MessageWindowChatMemory.withMaxMessages(10))
        .context(agenticScope -> contextSummarizer.summarize(agenticScope.contextAsConversation()))
        .outputKey("response")
        .build();
より一般的には、エージェントに提供されるコンテキストは、AgenticScope 状態の任意の関数にすることができます。この設定により、法律専門家は、隣人が引き起こした損害について訴訟を起こすべきかどうか尋ねられたときに、医療専門家との以前の会話を考慮に入れて、より多くの情報に基づいた回答を提供することができます。
内部的には、エージェント フレームワークは、送信されたユーザー メッセージを自動的に書き換えることにより、法律専門家に追加のコンテキストを提供します。これにより、以前の会話の要約されたコンテキストが含まれるため、この場合、実際のユーザー メッセージは次のようになります。
"Considering this context \"The user asked about what to do after breaking their leg, and the AI provided medical advice on immediate actions like immobilizing the leg, applying ice, and seeking medical attention.\"
You are a legal expert.
Analyze the following user request under a legal point of view and provide the best possible answer.
The user request is Should I sue my neighbor who caused this damage?."
エージェントで可能なコンテキスト生成の例としてここで説明した要約コンテキストは一般的に役立つため、次のように summarizedContext メソッドを使用して、より便利な方法でエージェント上でコンテキストを定義できます。
LegalExpertWithMemory legalExpert = AgenticServices
        .agentBuilder(LegalExpertWithMemory.class)
        .chatModel(BASE_MODEL)
        .chatMemoryProvider(memoryId -> MessageWindowChatMemory.withMaxMessages(10))
        .summarizedContext("medical", "technical")
        .outputKey("response")
        .build();
これにより、前に説明した ContextSummarizer エージェントが内部で使用され、定義されているエージェントと同じチャット モデルで実行されます。コンテキストを要約する必要があるエージェントの名前の可変引数をこのメソッドに追加して、エージェント システムで使用されているすべてのエージェントではなく、それらのエージェントに対してのみ要約が行われるようにすることもできます。
AgenticScope レジストリと永続性
AgenticScope は、エージェント システムの実行中に作成および使用される一時的なデータ構造です。エージェント システムごとにユーザーごとに 1 つの AgenticScope があります。ステートレス実行の場合、メモリが使用されていない場合、AgenticScope は実行の終了時に自動的に破棄され、その状態はどこにも保持されません。
逆に、エージェント システムがメモリを使用する場合、AgenticScope は内部レジストリに保存されます。この場合、AgenticScope はレジストリに永久に残り、ユーザーがステートフルで会話型の方法でエージェント システムと対話できるようになります。このため、特定の ID を持つ AgenticScope が不要になった場合は、レジストリから明示的に削除する必要があります。これを行うには、エージェント システムのルート エージェントは AgenticScopeAccess インターフェイスを実装する必要があります。これにより、レジストリから削除する必要がある AgenticScope の ID を渡して、その上で evictAgenticScope メソッドを呼び出すことができるようになります。
agent.evictAgenticScope(memoryId);
AgenticScope とそのレジストリはどちらも純粋にメモリ データ構造内にあります。通常、単純なエージェント システムにはこれで十分ですが、場合によっては、AgenticScope 状態をデータベースやファイル システムなどのより耐久性のあるストレージに保持すると便利な場合があります。これを実現するために、langchain4j-agentic モジュールは、AgenticScopeStore インターフェイスの実装であるカスタム永続層をプラグインするための SPI を提供します。この永続層はプログラム的に設定できます。
AgenticScopePersister.setStore(new MyAgenticScopeStore());
または、標準の Java サービス プロバイダー インターフェイスを使用して、AgenticScopeStore インターフェイスを実装するクラスの完全修飾名を含む META-INF/services/dev.langchain4j.agentic.scope.AgenticScopeStore という名前のファイルを作成します。
AgenticScope JSON シリアル化
LangChain4j は、AgenticScopeSerializer クラスを介して AgenticScope の組み込み JSON シリアル化を提供します。セキュリティ上の理由から、逆シリアル化では、JSON から逆シリアル化できるクラスを制限する許可リスト ポリシーが使用されます。デフォルトでは、標準の JDK 型 (java.util.*、java.math.*、プリミティブ ラッパー、列挙型) と内部 LangChain4j 型 (AgentMessage、AgentInvocation) が許可されます。
エージェントがカスタム ドメイン オブジェクトを AgenticScope 状態で保存する場合、逆シリアル化が発生する前にそれらを登録する必要があります。単一のクラスを登録できます。
AgenticScopeSerializer.allowDeserializationType(LoanApplication.class);
またはパッケージのプレフィックス全体:
AgenticScopeSerializer.allowDeserializationPackagePrefix("com.acme.myapp.");
未登録の型を逆シリアル化しようとすると、UnserializableAgenticScopeException がスローされ、そのメッセージは拒否されたクラスを指定し、その登録方法を提案します。
AgenticScope とエージェント システムの回復可能性
AgenticScopeStore が構成されている場合、langchain4j-agentic モジュールは組み込みの回復可能性サポートを提供し、エージェント システムがクラッシュまたはプロセスの再起動後に中断したところから実行を再開できるようにします。これは、プロセスが意図的に停止され、後で再起動される可能性がある人間参加型のステップを含む、長時間実行されるエージェント システムにとって特に有益です。
回復可能性は、ステップごとのチェックポイント と プランナー実行状態の永続性 という 2 つのメカニズムが連携して機能することに基づいています。
エージェントが呼び出されるたびに、現在の AgenticScope が構成されたストアに自動的にチェックポイントされます。これは、エージェントによって (writeState 経由で) 書き込まれたすべての中間状態が永続的に保持されることを意味します。さらに、実行ループはプランナの内部位置 (シーケンス内のどのエージェントに到達したかなど) を保存するため、回復時にワークフローが最初から再開するのではなく、正しいステップから再開されます。
Planner インターフェイスの実装は、オプションで次の 2 つの方法を通じてこのメカニズムに参加できます。
// Returns the planner's current internal state for persistence
default Map<String, Object> executionState() { return Map.of(); }

// Restores internal state from a previously saved map
default void restoreExecutionState(Map<String, Object> state) { }
たとえば、シーケンシャル プランナやループ プランナなどのステートフル プランナは、カーソル位置と反復カウンタを保存および復元するためにこれらのメソッドを実装します。ステートレス プランナー (ParallelPlanner や ConditionalPlanner など) は、デフォルトの no-op 実装を使用します。カスタム Planner 実装は、これらのメソッドをオーバーライドして、回復可能性に参加することもできます。また、実行ループは、プランナーの状態とともに自身の内部状態 (並列ブロックでどのエージェントが完了したかなど) も追跡するため、再開時に完了していないエージェントのみが再ディスパッチされます。
これがどのように機能するかを示す実際の例として、大量の注文を履行する前に人間がレビューする必要がある注文処理ワークフローを考えてみましょう。ワークフローには、注文を検証し、人間の承認を待ち、注文を発送するという 3 つのステップがあります。
public interface OrderWorkflow extends AgenticScopeAccess {
    @Agent
    String processOrder(@MemoryId String orderId, @V("order") String orderDetails);
}
@MemoryId アノテーションは必須です。これは、回復可能性に必要な永続スコープをアクティブ化します。ワークフローを 3 つのエージェントのシーケンスとして構築します。
// Step 1: Validate the order and write results to shared state
AgenticScopeAction validateOrder = AgenticServices.agentAction(scope -> {
    String order = scope.readState("order", "");
    scope.writeState("validated_order", "VALIDATED: " + order);
});

// Step 2: Pause for human approval using SuspendedResponse
HumanInTheLoop approvalGate = AgenticServices.humanInTheLoopBuilder()
        .description("Wait for manager approval on large orders")
        .outputKey("approval")
        .responseProvider(scope -> new SuspendedResponse<>("manager-approval"))
        .build();

// Step 3: Finalize based on the approval decision
AgenticScopeAction shipOrder = AgenticServices.agentAction(scope -> {
    String validated = scope.readState("validated_order", "");
    String approval = scope.readState("approval", "");
    scope.writeState("result", "Order " + validated + " — " + approval);
});

OrderWorkflow workflow = AgenticServices.sequenceBuilder(OrderWorkflow.class)
        .subAgents(validateOrder, approvalGate, shipOrder)
        .outputKey("result")
        .build();
このワークフローを実行すると、注文が検証され、HumanInTheLoop ステップに到達します。応答プロバイダーが SuspendedResponse を返すため、エージェント システムは呼び出しスレッドをブロックする代わりに、AgenticSystemSuspendedException をスローして実行を一時停止します。検証された注文データ、プランナーのカーソル位置 (ステップ 2 が完了)、および SuspendedResponse を含む全スコープがストア (構成されている場合) にチェックポイントされ、スレッドを解放するために AgenticSystemSuspendedException がスローされます。
try {
    String result = workflow.processOrder("order-12345", "1000 widgets");
    // Workflow completed normally
} catch (AgenticSystemSuspendedException e) {
    // Workflow suspended — waiting for human input
    AgenticScope scope = e.scope();
    Set<String> pendingIds = scope.pendingResponseIds(); // → ["manager-approval"]
    // Store the scope/pendingIds for your UI / REST API to present to the human
}
SuspendedResponse の代わりに、人間参加者は PendingResponse クラスのインスタンスを返し、人間の応答が提供されるまで呼び出しスレッドをブロックできます。本質的には:
| 応答タイプ | 行動 |
|---|---|
SuspendedResponse | エージェント システムを 一時停止します。スコープにチェックポイントを設定し、AgenticSystemSuspendedException をスローし、呼び出しスレッドを解放します。システムは、応答を完了し、エージェント メソッドを再度呼び出すことによって再開されます。 |
PendingResponse | complete() が別のスレッドから呼び出されるまで、基になる CompletableFuture の呼び出しスレッドを ブロックします。例外はスローされません。エージェント システムは所定の位置で待機します。 |
ユーザーは、応答が作成される時点 (responseProvider ラムダまたは @HumanInTheLoop 静的メソッド) でこの選択を行うことができます。
// Suspension: the agentic system checkpoints and throws AgenticSystemSuspendedException
.responseProvider(scope -> new SuspendedResponse<>("approval-id"))

// Blocking: the calling thread waits until complete() is called from another thread
.responseProvider(scope -> new PendingResponse<>("approval-id"))
クラッシュ耐性が重要な長時間実行のインタラクション (数時間/日) には SuspendedResponse を使用し、バックグラウンド スレッドがすぐに答えを提供する短期間のインプロセス待機には PendingResponse を使用することをお勧めします。
メソッドの戻り値の型が ResultWithAgenticScope の場合、中断時に例外はスローされません。代わりに、結果には suspended() == true と result() == null が含まれます。その後、保留中の応答を完了し、1 回の呼び出しで実行を再開できます。
ResultWithAgenticScope<String> result = workflow.processOrder("order-12345", "1000 widgets");
if (result.suspended()) {
    result = result.completePendingResponse("APPROVED by manager");
    // result.result() → "Order VALIDATED: 1000 widgets — APPROVED by manager"
}
これは、複数の連続した HITL ゲートを持つマルチステップ ワークフローで自然に機能します。各 completePendingResponse 呼び出しは、それ自体が一時停止される可能性がある新しい ResultWithAgenticScope を返します。
ResultWithAgenticScope<String> result = workflow.processOrder("order-12345", "1000 widgets");

result = result.completePendingResponse("Manager OK");   // resumes, suspends at legal gate
result = result.completePendingResponse("Legal OK");      // resumes, completes
// result.result() → final output
ResultWithAgenticScope は、制御フローの例外の使用を回避するため、一時停止を処理する場合に推奨されるアプローチです。
逆に、メソッドが ResultWithAgenticScope ではなくプレーン タイプ (例: String) を返す場合、システムは中断時に AgenticSystemSuspendedException をスローします。その場合、またはスコープを介して直接再開する必要がある場合(クラッシュ/再起動後など)、AgenticScope で応答を完了し、エージェント メソッドを再度呼び出すことができます。
AgenticScope scope = workflow.getAgenticScope("order-12345");

// Complete the single deferred response (when there is exactly one)
scope.completePendingResponse("APPROVED by manager");

// Or complete by explicit ID (useful when multiple responses are pending)
scope.completePendingResponse("manager-approval", "APPROVED by manager");

// Then re-invoke — the planner resumes from the checkpoint
String result = workflow.processOrder("order-12345", "1000 widgets");
completePendingResponse は、メモリ内のフューチャーを完了する (待機中のスレッドのブロックを解除する) ことと、状態マップ エントリを解決された値に置き換える (シリアル化が存続する) ことの両方に注意してください。遅延応答が 1 つだけ存在しない場合、単一引数のオーバーロードは IllegalStateException をスローします。
エージェントレジストリ
langchain4j-agentic モジュールは、AgentsRegistry の SPI (サービス プロバイダー インターフェイス) を提供し、外部プロバイダーが名前で検出して任意のエージェント パターンに接続できるエージェントを登録できるようにします。これは、リモート A2A プロトコル エージェントなどの外部システムによって提供されるエージェントをローカルに定義されたエージェント ワークフローに統合する場合に特に役立ちます。
AgentsRegistry インターフェイスは、エージェントを検出するための 2 つの方法を定義します。
public interface AgentsRegistry {

    Map<String, AgentInstance> allAgents();

    AgentInstance getAgent(String name);

    static AgentsRegistry get() { ... }
}
allAgents()は、名前をキーとしたすべての登録済みエージェントのマップを返します。getAgent(String name)は指定された名前のエージェントを返し、見つからない場合はRuntimeExceptionをスローします。
静的 get() メソッドは、Java の ServiceLoader を使用してレジストリ実装を検出します。複数のプロバイダーがサポートされており、単一の複合レジストリに自動的にマージされます。プロバイダー間でエージェント名が重複すると、検出時に例外が発生します。プロバイダーが見つからない場合は、検索をスローする空のレジストリが返されます。
レジストリ実装を提供するには、AgentsRegistry インターフェイスを実装するクラスを作成し、実装クラスの完全修飾名を含むファイル META-INF/services/dev.langchain4j.agentic.planner.AgentsRegistry を作成することで、標準の Java SPI メカニズムを介してそれを登録します。
public class MyAgentsRegistry implements AgentsRegistry {

    private final Map<String, AgentInstance> agents;

    public MyAgentsRegistry() {
        AgentInstance audienceEditor = (AgentInstance) AgenticServices
                .agentBuilder(AudienceEditor.class)
                .chatModel(myModel())
                .outputKey("story")
                .build();

        AgentInstance styleEditor = (AgentInstance) AgenticServices
                .agentBuilder(StyleEditor.class)
                .chatModel(myModel())
                .outputKey("story")
                .build();

        this.agents = Map.of(
                "audienceEditor", audienceEditor,
                "styleEditor", styleEditor);
    }

    @Override
    public Map<String, AgentInstance> allAgents() {
        return agents;
    }

    @Override
    public AgentInstance getAgent(String name) {
        AgentInstance agent = agents.get(name);
        if (agent == null) {
            throw new RuntimeException("No agent found with name: " + name);
        }
        return agent;
    }
}
レジストリによって返されるエージェントは標準の AgentInstance オブジェクトであり、通常は AgenticServices.agentBuilder() を使用して構築されるため、あらゆるエージェント パターンでサブエージェントとして使用できるようになります。
SPI 経由でレジストリが利用可能になると、エージェントをロードし、任意のエージェント パターンでローカルに定義されたエージェントと混合できます。
AgentsRegistry registry = AgentsRegistry.get();

CreativeWriter creativeWriter = AgenticServices
        .agentBuilder(CreativeWriter.class)
        .chatModel(BASE_MODEL)
        .outputKey("story")
        .build();

AgentInstance audienceEditor = registry.getAgent("audienceEditor");
AgentInstance styleEditor = registry.getAgent("styleEditor");

UntypedAgent novelCreator = AgenticServices.sequenceBuilder()
        .subAgents(creativeWriter, audienceEditor, styleEditor)
        .outputKey("story")
        .build();

String story = (String) novelCreator.invoke(Map.of(
        "topic", "dragons and wizards",
        "style", "fantasy",
        "audience", "young adults"));
ここで、CreativeWriter はローカルに構築されますが、AudienceEditor と StyleEditor は名前によってレジストリからロードされ、ローカルに定義されたものと並んでサブエージェントとして使用されます。
@RegistryAgent アノテーションを使用すると、宣言型 API でレジストリからエージェントをロードできます。これを使用するには、レジストリ内のエージェントの名前を指定して、@RegistryAgent アノテーションが付けられたメソッドを使用して単純なインターフェイスを定義します。
public interface AudienceEditorFromRegistry {
    @RegistryAgent("audienceEditor")
    String editStory(@V("story") String story, @V("audience") String audience);
}

public interface StyleEditorFromRegistry {
    @RegistryAgent("styleEditor")
    String editStory(@V("story") String story, @V("style") String style);
}
これらのインターフェイスは、完全に宣言的なエージェント システム定義のサブエージェントとして使用できます。
public interface DeclarativeStoryCreator {

    @SequenceAgent(outputKey = "story",
            subAgents = {CreativeWriter.class, AudienceEditorFromRegistry.class, StyleEditorFromRegistry.class})
    String write(@V("topic") String topic, @V("style") String style, @V("audience") String audience);

    @ChatModelSupplier
    static ChatModel chatModel() {
        return BASE_MODEL;
    }
}
そしていつものように AgenticServices.createAgenticSystem() でインスタンス化します。
DeclarativeStoryCreator storyCreator = AgenticServices.createAgenticSystem(DeclarativeStoryCreator.class);

String story = storyCreator.write("dragons and wizards", "fantasy", "young adults");
宣言型システムが @RegistryAgent アノテーションを検出すると、対応するエージェントを名前でレジストリから自動的にロードし、エージェント システムに接続します。 This allows mixing locally defined agents (like CreativeWriter with its @ChatModelSupplier) and registry-provided agents in the same declarative workflow.
A2A統合
追加の langchain4j-agentic-a2a モジュールは、A2A プロトコルとのシームレスな統合を提供し、リモート A2A サーバー エージェントを使用し、最終的にはそれらを他のローカルに定義されたエージェントと混合できるエージェント システムを構築できるようにします。
たとえば、最初の例で使用した CreativeWriter エージェントがリモート A2A サーバー上で定義されている場合、ローカル エージェントと同じように使用できる A2ACreativeWriter エージェントを作成できますが、リモート エージェントを呼び出します。
UntypedAgent creativeWriter = AgenticServices
        .a2aBuilder(A2A_SERVER_URL)
        .inputKeys("topic")
        .outputKey("story")
        .build();
エージェント機能の説明は、A2A サーバーによって提供されるエージェント カードから自動的に取得されます。ただし、このカードは入力引数の名前を提供しないため、inputKeys メソッドを使用して明示的に指定する必要があります。
あるいは、次のように A2A エージェントのローカル インターフェイスを定義することもできます。
public interface A2ACreativeWriter {

    @Agent
    String generateStory(@V("topic") String topic);
}
これにより、より型安全な方法で使用できるようになり、入力名はメソッドの引数から自動的に派生されます。
A2ACreativeWriter creativeWriter = AgenticServices
        .a2aBuilder(A2A_SERVER_URL, A2ACreativeWriter.class)
        .outputKey("story")
        .build();
このエージェントは、ワークフローを定義するとき、またはスーパーバイザのサブエージェントとして使用するときに、ローカル エージェントと同じ方法で使用したり、ローカル エージェントと混合したりできます。
リモート A2A エージェントは Task タイプを返す必要があります。
A2A サーバーとのマルチターン会話
A2A プロトコルは、メッセージ エンベロープの contextId フィールドと taskId フィールドを通じてマルチターン会話をサポートします。 contextId は関連するタスクを会話にグループ化しますが、taskId はその会話内の特定のタスクを参照します。省略すると、A2A サーバーは新しい値を生成します。指定された場合、サーバーは既存の会話を継続します。
これらのフィールドを送信メッセージ エンベロープで渡すには、メソッド パラメーターに @A2AContextId および @A2ATaskId の注釈を付けます。これらのパラメータはメッセージ コンテンツとして送信されません**。代わりにメッセージ エンベロープに設定されます。
public interface ChatAgent {

    @A2AClientAgent(a2aServerUrl = "http://localhost:8080", outputKey = "response")
    String chat(@V("question") String question,
                @A2AContextId @V("contextId") String contextId,
                @A2ATaskId @V("taskId") String taskId);
}
null が contextId または taskId に渡されると、フィールドはエンベロープから省略され、サーバーは新しい値を作成します。
@A2AContextId または @A2ATaskId パラメーターにも認識可能な名前があり、おそらく @V アノテーションを通じて構成されている場合、サーバーによって割り当てられた応答の値は、その名前で AgenticScope に自動的に書き戻されます。これにより、最初の呼び出しで ID を取得し、後続の呼び出しで ID を再利用するマルチターン フローが有効になります。
メソッドが ResultWithAgenticScope を返す場合、ID に直接アクセスできます。
public interface ChatAgent {

    @A2AClientAgent(a2aServerUrl = "http://localhost:8080", outputKey = "response")
    ResultWithAgenticScope<String> chat(
            @V("question") String question,
            @A2AContextId @V("contextId") String contextId,
            @A2ATaskId @V("taskId") String taskId);
}

// First turn — server generates contextId and taskId
ResultWithAgenticScope<String> first = chatAgent.chat("hello", null, null);
String contextId = (String) first.agenticScope().readState("contextId");
String taskId = (String) first.agenticScope().readState("taskId");

// Second turn — reuse the server-generated IDs to continue the conversation
ResultWithAgenticScope<String> second = chatAgent.chat("follow-up", contextId, taskId);
このように、A2A エージェントがエージェント システムで使用される場合、contextId と taskId は共有 AgenticScope を通じて自動的に伝播されます。これは、同じサーバーに対する 2 つの A2A 呼び出しのシーケンスが自然に複数ターンの会話を形成することを意味します。
public interface EchoSubAgent {

    @A2AClientAgent(a2aServerUrl = "http://localhost:8080", outputKey = "response")
    String echo(@V("question") String question,
                @A2AContextId @V("contextId") String contextId,
                @A2ATaskId @V("taskId") String taskId);
}

public interface MultiTurnWorkflow extends AgenticScopeAccess {

    @Agent
    ResultWithAgenticScope<String> converse(@V("question") String question);
}

EchoSubAgent firstTurn = AgenticServices
        .a2aBuilder("http://localhost:8080", EchoSubAgent.class)
        .outputKey("firstResponse").build();
EchoSubAgent secondTurn = AgenticServices
        .a2aBuilder("http://localhost:8080", EchoSubAgent.class)
        .outputKey("secondResponse").build();

MultiTurnWorkflow workflow = AgenticServices.sequenceBuilder(MultiTurnWorkflow.class)
        .subAgents(firstTurn, secondTurn)
        .outputKey("secondResponse").build();

ResultWithAgenticScope<String> result = workflow.converse("hello");
このシーケンスでは、最初のエージェントは contextId/taskId を含まないメッセージを送信します (スコープ内では null です)。サーバーは新しいタスクとコンテキストを作成します。応答 ID はスコープに書き込まれます。 2 番目のエージェントが実行されると、現在設定されている contextId と taskId をスコープから読み取り、メッセージ エンベロープで送信し、同じ会話を継続します。
A2A クライアントのカスタマイズ
デフォルトでは、A2A エージェントはデフォルト設定の JSONRPC トランスポートを使用します。 clientCustomizer メソッドは、基礎となる a2a-java SDK ClientBuilder を公開し、別のトランスポートの構成、カスタム HTTP クライアントの設定、インターセプターの追加、またはその他のクライアント設定の変更を可能にします。
A2A エージェントをプログラムで構築する場合は、Consumer<ClientBuilder> を clientCustomizer に渡します。
UntypedAgent creativeWriter = AgenticServices
        .a2aBuilder(A2A_SERVER_URL)
        .clientCustomizer((ClientBuilder cb) ->
                cb.withTransport(JSONRPCTransport.class, new JSONRPCTransportConfigBuilder()))
        .inputKeys("topic")
        .outputKey("story")
        .build();
カスタマイザーが提供されると、デフォルトのトランスポート設定が完全に置き換えられ、Client の構築方法を完全に制御できるようになります。
宣言型エージェントの場合、静的メソッドに @A2AClientCustomizer の注釈を付けます。このメソッドは 1 つの ClientBuilder パラメーターを受け取り、void を返す必要があります。
public interface DeclarativeA2AWithCustomizer {

    @A2AClientAgent(a2aServerUrl = "http://localhost:8080", outputKey = "story")
    String generateStory(@V("topic") String topic);

    @A2AClientCustomizer
    static void customizer(ClientBuilder cb) {
        cb.withTransport(JSONRPCTransport.class, new JSONRPCTransportConfigBuilder());
    }
}
A2A サーバー URL を動的に構成する
デフォルトでは、@A2AClientAgent アノテーションには、a2aServerUrl 属性を介したコンパイル時の文字列リテラルとして A2A サーバー URL が必要です。 URL が異なる環境 (開発、ステージング、運用など) の場合は、代わりに、@A2AServerUrlSupplier アノテーションが付けられた静的メソッドを使用して、ビルド時に URL を動的に提供できます。
public interface DeclarativeA2AWithUrlSupplier {

    @A2AClientAgent(outputKey = "story")
    String generateStory(@V("topic") String topic);

    @A2AServerUrlSupplier
    static String serverUrl() {
        return System.getenv("A2A_SERVER_URL");
    }
}
サプライヤー メソッドは static である必要があり、パラメーターを受け取らず、String を返します。これは、エージェントの構築時に 1 回呼び出されます。URL は呼び出し間で変更されません。アノテーション内の a2aServerUrl または @A2AServerUrlSupplier メソッドの 1 つだけを指定する必要があります。両方を指定しても (またはどちらも指定しなくても) エラーになります。
このパターンは、@McpClientSupplier が @McpClientAgent 宣言型エージェントに MCP クライアントを提供する方法と一致しています。
MCPベースのツールエージェント
追加の langchain4j-agentic-mcp モジュールを使用すると、単一の MCP ツールをエージェント システム内の非 AI エージェントとしてラップできます。 LLM を使用する通常のエージェントとは異なり、MCP ツール エージェントは単純に MCP ツールを直接実行し、その結果を返します。これにより、ツールの実行自体に LLM を関与させることなく、大規模なエージェント システムで他のエージェントを使用して MCP ツールを構成することが可能になります。
MCP ツール エージェントを作成するには、McpClient インスタンスを提供する McpAgent.builder() を使用します。ビルダーは MCP サーバーにツールの仕様 (名前、説明、入力スキーマ) を照会し、呼び出しをそのツールに転送するエージェントを作成します。
たとえば、MCP サーバーが generate_story ツールを公開する場合、それを型なしエージェントとしてラップできます。
McpClient mcpClient = new DefaultMcpClient.Builder()
        .transport(myMcpTransport)
        .build();

UntypedAgent storyGenerator = McpAgent.builder(mcpClient)
        .toolName("generate_story")
        .inputKeys("topic")
        .outputKey("story")
        .build();

String story = (String) storyGenerator.invoke(Map.of("topic", "dragons and wizards"));
toolName は、MCP サーバーが複数のツールを公開するときにどのツールをバインドするかを指定します。サーバーがツールを 1 つだけ公開する場合、toolName は省略でき、使用可能な 1 つのツールが自動的に選択されます。 inputKeys は、ツールの入力パラメータの名前を指定します。型指定されていないエージェントの場合、明示的に指定しない場合、これらもツールの JSON スキーマから自動的に導出されます。
他のエージェントと同様に、MCP ツール エージェントも型付きインターフェイスを使用して作成できます。
public interface StoryGenerator {

    @Agent
    String generateStory(@V("topic") String topic);
}

StoryGenerator storyGenerator = McpAgent.builder(mcpClient, StoryGenerator.class)
        .toolName("generate_story")
        .outputKey("story")
        .build();

String story = storyGenerator.generateStory("dragons and wizards");
この場合、入力パラメーター名はメソッド パラメーター (またはその @V 注釈) から派生し、戻り値の型によってツールのテキスト結果が解析される方法が決まります。
最後に、MCP ツール エージェントは、@McpClientAgent アノテーションを使用して宣言的に定義することもできます。 @McpClientSupplier アノテーションは、McpClient インスタンスを提供する静的メソッドをマークします。
public interface DeclarativeMcpStoryGenerator {

    @McpClientAgent(toolName = "generate_story", outputKey = "story",
            description = "Generates a story based on the given topic")
    String generateStory(@V("topic") String topic);

    @McpClientSupplier
    static McpClient mcpClient() {
        McpTransport transport = new StreamableHttpMcpTransport.Builder()
                .url("http://localhost:8081/mcp")
                .build();
        return new DefaultMcpClient.Builder()
                .transport(transport)
                .build();
    }
}